/**
 * Automatically add product to cart on visit
 */
add_action('template_redirect', 'add_product_to_cart');
function add_product_to_cart()
{
  $simple_product_id = 567;


  if (!is_admin()) {
    $product_id = 567; //replace with your own product id
    $found = false;


    //check if product already in cart
    if (sizeof(WC()->cart->get_cart()) > 0) {
      foreach (WC()->cart->get_cart() as $cart_item_key => $values) {
        $_product = $values['data'];
        if ($_product->get_id() == $product_id)
          $found = true;
      }

        // товар с ID 27 в корзине
        // if product not found, add it

        if (!$found)
          WC()->cart->add_to_cart($product_id);
        } else {
          // if no products in cart, add it
          WC()->cart->add_to_cart($product_id);


    }
  }
}
function prefix_redirect_function() {
if ( is_page(552 , 554) && !is_user_logged_in() ) { // 42 это ID
// редирект на главную:        wp_redirect( home_url() );
// или так на url:
// wp_redirect( ‘http://www.example.com’, 301 );exit;
    }
}
// On functions.php of your child theme or in a code snippet:
add_action('wp_logout','auto_redirect_after_logout');
function auto_redirect_after_logout(){
  wp_redirect( home_url() );
  exit();
}
<?php
// As is this will check if the form is in a popup, if so set a cookie and close after 5 seconds.

// Copy everything below this line.
function custom_cf7_scripts() { ?>
	<script type="text/javascript">
		var wpcf7Elm = document.querySelector('.wpcf7');

		wpcf7Elm.addEventListener('wpcf7submit', function (event) {
			var $form = $(event.target),
				$popup = $form.parents('.pum');

			if (!$popup.length) {
				return;
			}

			$popup.trigger('pumSetCookie');

			setTimeout(function () {
				$popup.popmake('close');
			}, 5000);
		}, false);
	</script><?php
}

add_action( 'wp_footer', 'custom_cf7_scripts' );
jsonstring with APIs parameters is encoded by the base64_encode( json_string ) function , where base64_encode – returns a string encoded by the base64 method
signature
Required
String
Unique signature of each request base64_encode( sha1( private_key + data + private_key) ) , where sha1 is a returned hash in the form of a binary string of 20 characters .
embedTo
Optional
String
The element on the HTML page in which the widget will be displayed
mode
Optional
String
Widget display mode on the site . Possible values : embed – built-in window , popup – pop-up window on your site .
The public key is the store identifier. You can get the key in the store settings
action
Required
String
Type of operation. Possible values : pay – payment , hold – blocking funds on the sender’s account , subscribe – regular payment , paydonate – donation , auth – pre- authorization of the card
amount
Required
Number
Payment amount. For example : 5 , 7.34
currency
Required
String
Payment currency. Possible values : USD , EUR , UAH
description
Required
String
Purpose of payment .
order_id
Required
String
Unique purchase ID in your store. The maximum length is 255 characters .
expired_date
Optional
String
The time by which the client can pay the bill in UTC . Transmitted in 2016-04-24 00:00:00 format
language
Optional
String
Client language ru , uk , en
paytypes
Optional
String
The parameter that transmits the payment methods that will be displayed at the checkout. Possible values apay – payment using Apple Pay , gpay – payment using Google Pay , card – payment by card , liqpay – through the liqpay account , privat24 – through the privat24 account , masterpass – through the masterpass account , moment_part – installment , cash – cash , invoice – bill to e-mail , qr– QR code scanning. If the parameter is not passed, then the store settings, Checkout tab are applied .
result_url
Optional
String
The URL in your store to which the buyer will be redirected after completing the purchase. The maximum length is 510characters .
server_url
Optional
String
API URL in your store for notifications about the change of payment status ( server -> server ). The maximum length is 510 characters . More details
verifycode
Optional
String
A possible value of Y . Dynamic verification code, generated and returned in Callback . Similarly, the generated code will be transferred in the verification transaction for display in the client’s card statement. Works for action = auth .
Payment splitting options
split_rules
Optional
String
Payment with splitting the amount to several recipients. This parameter specifies a JSON array with payment splitting rules. When using the split_rules parameter, there is one debit from the client and several credits to the recipients. The acquiring fee is charged to each store in the split_rules array . Example JSON string :
Payment with splitting the amount to several recipients. This parameter specifies a JSON array with payment splitting rules. When using the split_rules parameter, there is one debit from the client and several credits to the recipients. The acquiring fee is charged to each store in the split_rules array . Example JSON string
To enable the acceptance of payments by letter of credit, pass the parameter with the value 1
letter_of_credit_date
Optional
String
Letter of credit expiration date in the following format : 2015-03-31 00:00:00 UTC .
Regular payment options
subscribe
Optional
String
Regular payment. Possible values : 1
subscribe_date_start
Optional
String
Date of first payment. The time must be specified in the following format : 2015-03-31 00:00:00 UTC . If an expired date is specified, the subscription will be activated from the current date of receipt of the request
subscribe_periodicity
Optional
String
Periodicity of withdrawal of funds. Possible values : month – once a month year – once a year
Options for payment in 1 click
customer
Optional
String
The unique identifier of the client on the merchant’s website. When transferring the parameter, LiqPay remembers the client’s payment details and his identifier – further payment can be made in 1 click. The maximum length is 100 characters . ( When using the parameter for <b>Masterpass 1 click</b>, the valid phone number of the payer is transferred in this field )
recurringbytoken
Optional
String
Allows you to generate the payer’s card_token , which you will receive in the callback request to server_url . card_token allows you to make payments without entering the details of the payer’s card, using the token payment API – that is, in 1 click. To receive a card_token , you must pass the following values in the request : 1
customer_user_id
Optional
String
User ID in the merchant system, transmitted at each user payment (must not match customer , used for payment using the <b>Masterpass 1 click</b> wallet )
Other parameters
dae
Optional
String
Long entry Detail Addenda . The dae parameter is a JSON string to which the base64 function has been applied . JSON can contain the following parameters :
{
  "airLine": "Avia", // абревіатура авіакомпанії, max 4 символів.
  "ticketNumber": "ACSFD12354SA", // номер квитка, max 15 символів.
  "passengerName": "John Doe", // ім'я пасажира, max 29 символів.
  "flightNumber": "742", // номер рейсу, max 5 цифр.
  "originCity": "DP", // код міста/аеропорту вильоту, max 5 символів.
  "destinationCity": "NY", // код міста/аеропорту призначення, max 5 символів.
  "departureDate": "100514" // дата вильоту в форматі YYMMDD, max 6 цифр.
}
function true_hide_pages_from_admin( $query ) {
	global $pagenow;
	if( is_admin() && 'edit.php' == $pagenow && 'page' == get_query_var('post_type') ){
		// в качестве 'page' в условии можно указать любой произвольный тип постов
		$query->set( 'post__not_in', array(300,271) );
		// через запятую прописываем ID страниц, которые хотим скрыть
	}
	return $query;
}

add_action( 'pre_get_posts' ,'true_hide_pages_from_admin' );
function true_hide_posts_from_admin( $query ) {
	global $pagenow;
	if( is_admin() && 'edit.php' == $pagenow ){
		$query->set( 'post__not_in', array(9,54) );
		// через запятую указываем ID постов или страниц, которые хотим скрыть
	}
	return $query;
}

add_action( 'pre_get_posts' ,'true_hide_posts_from_admin' );
    if ( $product->is_in_stock() ) {
        echo '<div class="stock" >' . $product->get_stock_quantity() . ' в наличии</div>';
    } else {
        echo '<div class="out-of-stock" >Нет в наличии</div>';
    }
function my_stock_loop() {
    global $product;
    if ( $product->is_in_stock() ) {
        echo '<div class="stock" >' . $product->get_stock_quantity() . ' в наличии</div>';
    } else {
        echo '<div class="out-of-stock" >Нет в наличии</div>';
    }
}
add_action( 'woocommerce_after_shop_loop_item_title', 'my_stock_loop' );
add_filter( 'woocommerce_get_price_html', 'my_price_html', 100, 2 );
function my_price_html( $price, $product ){
  global $product;
  $return_string = $price;
  if ( $product->stock_status == 'outofstock' ) {
  	  $return_string = $price .'  (Нет в наличии)';
     }
  return $return_string;
}
add_filter( 'woocommerce_product_subcategories_hide_empty', 'hide_empty_categories', 10, 1 );
function hide_empty_categories ( $hide_empty ) {
    $hide_empty  =  FALSE;
    // You can add other logic here too
    return $hide_empty;
}
add_filter( 'woocommerce_product_subcategories_hide_empty', 'show_empty_categories', 10, 1 );
function show_empty_categories ( $show_empty ) {
    $show_empty  =  TRUE;
    // You can add other logic here too
    return $show_empty;
}
In order to display the description of the Woocommerce product category at the bottom of the page – under the products, you need to add the following code to the functions.php file of the theme:
Fixed Percentage Discount on Whole Cart in WooCommerce So, let’s start with the simplest discount – fixed. In it, the discount will be applied to the entire basket as a result, without unnecessary actions on the part of the user.
Discount script:
function woo_discount_total(WC_Cart $cart) {

	if(is_admin() && !defined('DOING_AJAX')) {

		return;

	}

	$discount = $cart->subtotal * 0.05; // 0.05 - это 5%

	$cart->add_fee('Фиксированная скидка в 5% ', -$discount);

}

add_action('woocommerce_cart_calculate_fees' , 'woo_discount_total');
You paste it at the bottom of your functions.php file, which is located in your theme folder.
Fixed (applied when there are specific items in the cart) percentage discount on the entire cart in WooCommerce The second option for a fixed discount is a discount that is applied depending on which products (or bundles of products) are in the cart.
A script for applying a discount when there is a specific item in the cart:
function woo_discount_total(WC_Cart $cart) {

	if(is_admin() && !defined('DOING_AJAX')) {

		return;

	}

	$array_product_id = [];

	foreach($cart->get_cart() as $cart_item) {

		$array_product_id[] = $cart_item['product_id'];

	}

	if(in_array(6, $array_product_id)) { // Если в корзине есть товар с ID = 6

		$discount = $cart->subtotal * 0.05; // 0.05 - это 5%

		$cart->add_fee('Фиксированная скидка в 5% за выбор акционного товара ', -$discount);

	}

}

add_action('woocommerce_cart_calculate_fees' , 'woo_discount_total');
A script for applying a discount when there is one of the items in the cart:
function woo_discount_total(WC_Cart $cart) {

	if(is_admin() && !defined('DOING_AJAX')) {

		return;

	}

	$array_product_id = [];

	foreach($cart->get_cart() as $cart_item) {

		$array_product_id[] = $cart_item['product_id'];

	}

	if(in_array(6, $array_product_id) || in_array(7, $array_product_id)) { // Если в корзине есть товар с ID = 6 или ID = 7

		$discount = $cart->subtotal * 0.05; // 0.05 - это 5%

		$cart->add_fee('Фиксированная скидка в 5% за выбор акционного товара ', -$discount);

	}

}

add_action('woocommerce_cart_calculate_fees' , 'woo_discount_total');
Script for applying discounts for specific items in the cart:
function woo_discount_total(WC_Cart $cart) {

	if(is_admin() && !defined('DOING_AJAX')) {

		return;

	}

	$array_product_id = [];

	foreach($cart->get_cart() as $cart_item) {

		$array_product_id[] = $cart_item['product_id'];

	}

	if(in_array(6, $array_product_id) && in_array(7, $array_product_id)) { // Если в корзине есть товары с ID = 6 и ID = 7

		$discount = $cart->subtotal * 0.05; // 0.05 - это 5%

		$cart->add_fee('Фиксированная скидка в 5% за выбор акционных товаров ', -$discount);

	}

}

add_action('woocommerce_cart_calculate_fees' , 'woo_discount_total');
The one you need, you paste at the bottom of the functions.php file, which is located in your theme folder. If you are using variable products, then “product_id” in the code should be replaced with “variation_id”.
Fixed (applied when there are products from specific categories in the cart) percentage discount on the entire cart in WooCommerce Here, as you already understood, unlike the previous option, for applying a discount, it is not the product itself that is checked, but the category in which it is located.
A script for applying a discount when there is an item in the cart from a specific category
function woo_discount_total(WC_Cart $cart) {

	if(is_admin() && !defined('DOING_AJAX')) {

		return;

	}

	foreach($cart->get_cart() as $cart_item) {

		if(has_term(16, 'product_cat', $cart_item['product_id'])) { // Если в корзине есть товар из категории с ID = 16

			$discount = $cart->subtotal * 0.05; // 0.05 - это 5%

			$cart->add_fee('Фиксированная скидка в 5% за выбор товара из акционной категории ', -$discount);

			break;

		}

	}

}

add_action('woocommerce_cart_calculate_fees' , 'woo_discount_total');
A script for applying a discount if there is an item in the basket from one category:
function woo_discount_total(WC_Cart $cart) {

	if(is_admin() && !defined('DOING_AJAX')) {

		return;

	}

	foreach($cart->get_cart() as $cart_item) {

		if(has_term([16, 23], 'product_cat', $cart_item['product_id'])) { // Если в корзине есть товар из категории с ID = 16 или ID = 23

			$discount = $cart->subtotal * 0.05; // 0.05 - это 5%

			$cart->add_fee('Фиксированная скидка в 5% за выбор товара из акционной категории ', -$discount);

			break;

		}

	}

}

add_action('woocommerce_cart_calculate_fees' , 'woo_discount_total');
A script for applying a discount when there is an item in the cart from specific categories:
function woo_discount_total(WC_Cart $cart) {

	if(is_admin() && !defined('DOING_AJAX')) {

		return;

	}

	foreach($cart->get_cart() as $cart_item) {

		if(has_term(16, 'product_cat', $cart_item['product_id']) && has_term(23, 'product_cat', $cart_item['product_id'])) { // Если в корзине есть товар из категории с ID = 16 и ID = 23

			$discount = $cart->subtotal * 0.05; // 0.05 - это 5%

			$cart->add_fee('Фиксированная скидка в 5% за выбор товара из акционных категорий ', -$discount);

			break;

		}

	}

}

add_action('woocommerce_cart_calculate_fees' , 'woo_discount_total');
A script for applying a discount when there are goods in the basket from specific categories:
function woo_discount_total(WC_Cart $cart) {

	if(is_admin() && !defined('DOING_AJAX')) {

		return;

	}

	$one_category = false; // Товар из первой категории
	$two_category = false; // Товар из второй категории

	foreach($cart->get_cart() as $cart_item) {

		if(has_term(16, 'product_cat', $cart_item['product_id'])) { // Если в корзине есть товар из категории с ID = 16

			$one_category = true;

		}

		if(has_term(23, 'product_cat', $cart_item['product_id'])) { // Если в корзине есть товар из категории с ID = 23

			$two_category = true;

		}

	}

	if($one_category && $two_category) { // Если в корзине есть товары из категорий с ID = 16 и ID = 23

		$discount = $cart->subtotal * 0.05; // 0.05 - это 5%

		$cart->add_fee('Фиксированная скидка в 5% за выбор товаров из акционных категорий ', -$discount);

	}

}

add_action('woocommerce_cart_calculate_fees' , 'woo_discount_total');
The one you need, you insert all the same at the bottom of the functions.php file, which is located in your theme folder.
Fixed (depending on the selected shipping method) percentage discount on the entire cart in WooCommerce In addition to the fact that we can tie the discount to a specific product or, for example, its category, it is just as easy to organize a discount for the selected delivery method.
A script for applying a discount when choosing a specific delivery method:
A script for applying a discount when choosing one of the specified delivery methods:
function woo_discount_total(WC_Cart $cart) {

	if(is_admin() && !defined('DOING_AJAX')) {

		return;

	}

	global $woocommerce;

	$delivery_name = '';
	$delivery_selected = [];
	$available_methods = $woocommerce->shipping->get_packages();

	if(isset($woocommerce->session)) {

		$delivery_selected = $woocommerce->session->get('chosen_shipping_methods');

	}

	foreach($available_methods as $method) {

		foreach($delivery_selected as $delivery) {

			if(isset($method['rates'][$delivery])) {

				$delivery_name = $method['rates'][$delivery]->label;

				break;

			}

		}

	}

	if($delivery_name == 'Самовывоз' || $delivery_name == 'СДЭК') {

		$discount = $cart->subtotal * 0.05; // 0.05 - это 5%

		$cart->add_fee('Фиксированная скидка в 5% за выбранный способ доставки ', -$discount);

	}

}

add_action('woocommerce_cart_calculate_fees' , 'woo_discount_total');
The one you need, you paste at the bottom of the functions.php file, which is located in your theme folder.
Dynamic (variable depending on the total) percentage discount for the whole basket in WooCommerce Unlike the aforementioned options with a fixed discount, the task is a little more complicated here. We will tie our discount to a price range. And, for example, when a person has ordered goods in the amount from 1000 to 10,000, we will give him one discount, and higher – another.
The implementation will look like this:
function woo_discount_total(WC_Cart $cart) {

	if(is_admin() && !defined('DOING_AJAX')) {

		return;

	}

	$woo_current_price = $cart->subtotal; // Текущая итоговая сумма

	if($woo_current_price >= 1000 && $woo_current_price <= 10000) {

		$discount = $cart->subtotal * 0.03; // 0.03 - это 3%
		$cart->add_fee('Скидка в 3% за заказ на сумму от 1 000 до 10 000 рублей ', -$discount);

	} elseif($woo_current_price > 10000) {

		$discount = $cart->subtotal * 0.05; // 0.05 - это 5%
		$cart->add_fee('Скидка в 5% за заказ на сумму более 10 000 рублей ', -$discount);

	}

}

add_action('woocommerce_cart_calculate_fees' , 'woo_discount_total');
You also insert it at the very bottom of the functions.php file, which is located in your theme folder.
Dynamic (changing depending on the total number of products) percentage discount on the entire cart in WooCommerce Here, as you understood from the title, we will not calculate the discount on the amount, as we did in the second option, but on the number of items in the basket.
Implementation:
function woo_discount_total(WC_Cart $cart) {

	if(is_admin() && !defined('DOING_AJAX')) {

		return;

	}

	$woo_count_item = $cart->get_cart_contents_count(); // Количество товаров в корзине

	if($woo_count_item >= 10 && $woo_count_item <= 50) {

		$discount = $cart->subtotal * 0.03; // 0.03 - это 3%
		$cart->add_fee('Скидка в 3% за заказ включающий в себя от 10 до 50 товаров ', -$discount);

	} elseif($woo_count_item > 50) {

		$discount = $cart->subtotal * 0.05; // 0.05 - это 5%
		$cart->add_fee('Скидка в 5% за заказ включающий в себя более 50 товаров ', -$discount);

	}

}

add_action('woocommerce_cart_calculate_fees' , 'woo_discount_total');
// Custom validation for Billing Phone checkout field
add_action('woocommerce_checkout_process', 'custom_validate_billing_phone');
function custom_validate_billing_phone() {
    $is_correct = preg_match('^((8|\+7)[\- ]?)?(\(?\d{3}\)?[\- ]?)?[\d\- ]{7,10}$', $_POST['billing_phone']);
    if ($_POST['billing_phone'] && !$is_correct) {
     wc_add_notice(__('The Phone field should be <strong>between 6 and 20 digits</strong>.'), 'error');
    }
}
When you go through code, make sure that jQuery is included and will load before your script. Even, the jQuery should be loaded once only. If it is loading multiple times, it will cause problems.
If it is not included, then pass it as third argument in your wp_enqueue_script () function as follows:
Secondly, you will make sure that your JavaScript will start as follows:
jQuery(document).ready(function()

{

jQuery(#selector) ...

});

(function($) {

// Use $() inside of this function

$(#selector) ...

})(jQuery);
Step 3: Ensure that jQuery is Loaded
Sometimes, there are issues because the jQuery is not loaded though included. So to make sure that jQuery is loaded, copy the URL from script src and paste it in the new browser tab. For example: If the script src is this:
Step one. Adding the shape of the fields to the snippet
WooCommerce has such a functionality of fragments, you can add the desired html to them and display in the right place. So, add the snippet
The code has been changed. The previous snippet will work, but if the store uses a personal account, then there will be problems. Since this form is connected in the checkout / form-billing.php file, it is more correct to use the following code
Shipping methods are assumed to be configured. For example, two methods have been created. Now you need to specify the desired shipping method identifier. The easiest way is to look in the source code
Selected lines are identifiers. Now it is enough to make a check and if we get the desired delivery method, delete the extra fields
The code is connected to the wp_footer hook, if desired, it can be placed in a separate file. The code was tested against the standard StoreFront theme. Everything should work correctly.
And the update of the fields is also done not after the update of the delivery methods, but in parallel with this update
Open the WordPress theme’s functions.php file and add a filter for woocommerce to it (ATTENTION !!! The code below is added to the end of the functions.php file)
Note. If you already have Laravel installation, you can skip this step.
Being a package for the framework, you must first install Laravel. This can be done using the Composer dependency management tool by running the composer create-project command in your terminal:
Don’t you have Composer? It’s easy to install by following the instructions on the download page.
It will create a new orchid-project directory, load the dependencies, and generate the leading directories and files you need to get started. In other words, install your new framework project.
Do not forget
Set “chmod -R o+w” rights to the storage and bootstrap/cache directories
Edit the .env file
Note. If you just installed Laravel, you may need to generate a key with command php artisan key:generate
If you haven’t installed a server (Nginx, Apache, etc.) to run the project, you can use the built-in server:
php artisan serve
Open a browser and go to http://localhost:8000/admin. If everything works, you will see the control panel login page. Later you can stop the server by pressing Ctrl + C in the terminal.
Note. Suppose your runtime uses a different domain (e.g., orchid.loc). In that case, the admin panel may not be available. You need to specify your domain in the configuration file config/platform.php or .env file. It allows you to make the admin panel available on another domain or subdomain, such as platform.example.com.
By default, static files (css / js) are delivered via app routes. It is the best balance between configuration and change tracking, but you can specify web servers for distribution. To do this, you need to run a command that creates a symbolic link in the public directory. Please only use it if your web server is having problems:
php artisan orchid:link
Problems encountered during installation? It is possible that someone already had this problem https://github.com/orchidsoftware/platform/issues. If not, you can send a message or ask for help.
First of all, read the warning! He says don’t run composer as root! Second, you are probably using Xammp on your local machine, which has the required php libraries by default.
But on your server you are missing ext-dom. php-xml has all the required bundled packages. Thus, you can simply install it by running:
sudo apt-get update
sudo apt install php-xml
Most likely you are missing mbstring too. If you get an error, install this package also with:
Especially for those who already know everything, but are just looking for a quick answer on how to insert a shortcode into a wordpress template or another engine, please use this code:
However, don’t forget about punctuation! The quotes in your shortcode and php code must be different.
That is, if in your WordPress site template, you use the same shortcode, but with two quotes inside ([“…”]), and in your php code, you also use double quotes (“[…]”) , then you need to change one of them to single ones. It is because of such small reasons that shortcodes in wordpress often do not work.
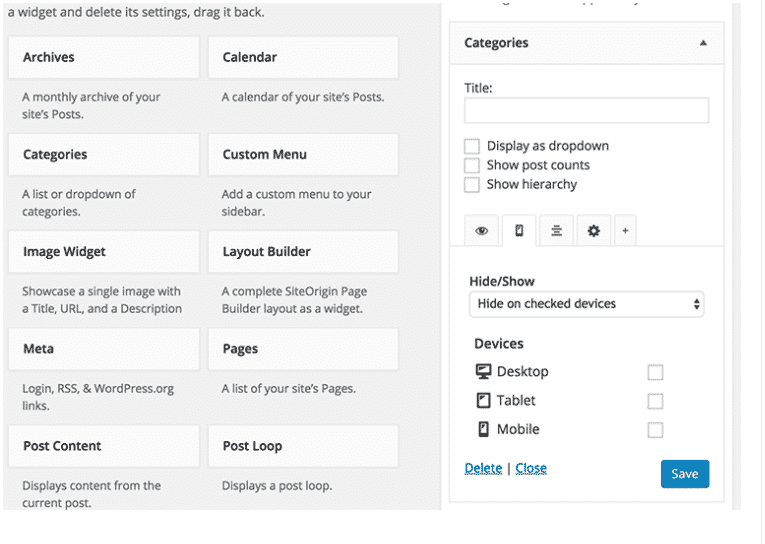
This plugin extends to allow shop owners to add custom tabs to products. The tabs are displayed on the individual product pages to the right of the default “Description” tab.
Individual product tabs are managed on the WooCommerce Edit Product screen and can be added on a per product basis. You can also create saved tabs and add them to multiple products as needed. Tabs can be easily added, deleted and rearranged.
Tab content areas use the standard WordPress text editor and may contain text, images, HTML or shortcodes.
In general, there are three main requests (there is a fourth request in the screenshot, but about it a little later). So, https://test.onmywaystudio.net/ is the old domain, https://onmywaystudio.net/ is the new one.
WordPress database table names are prefixed. By default, this is wp_, but on your site the prefix can be absolutely anything, for example, your wp_posts table may be called omw_posts or qwertyposts, keep that in mind.
UPDATE wp_options SET option_value = REPLACE (option_value, ‘https://test.onmywaystudio.net/’, ‘https://onmywaystudio.net/’) WHERE option_name = ‘home’ OR option_name = ‘siteurl’;
UPDATE wp_posts SET post_content = REPLACE (post_content, ‘https://test.onmywaystudio.net/’, ‘https://onmywaystudio.net/’);
UPDATE wp_postmeta SET meta_value = REPLACE (meta_value, ‘https://test.onmywaystudio.net/’,’https://onmywaystudio.net/’);
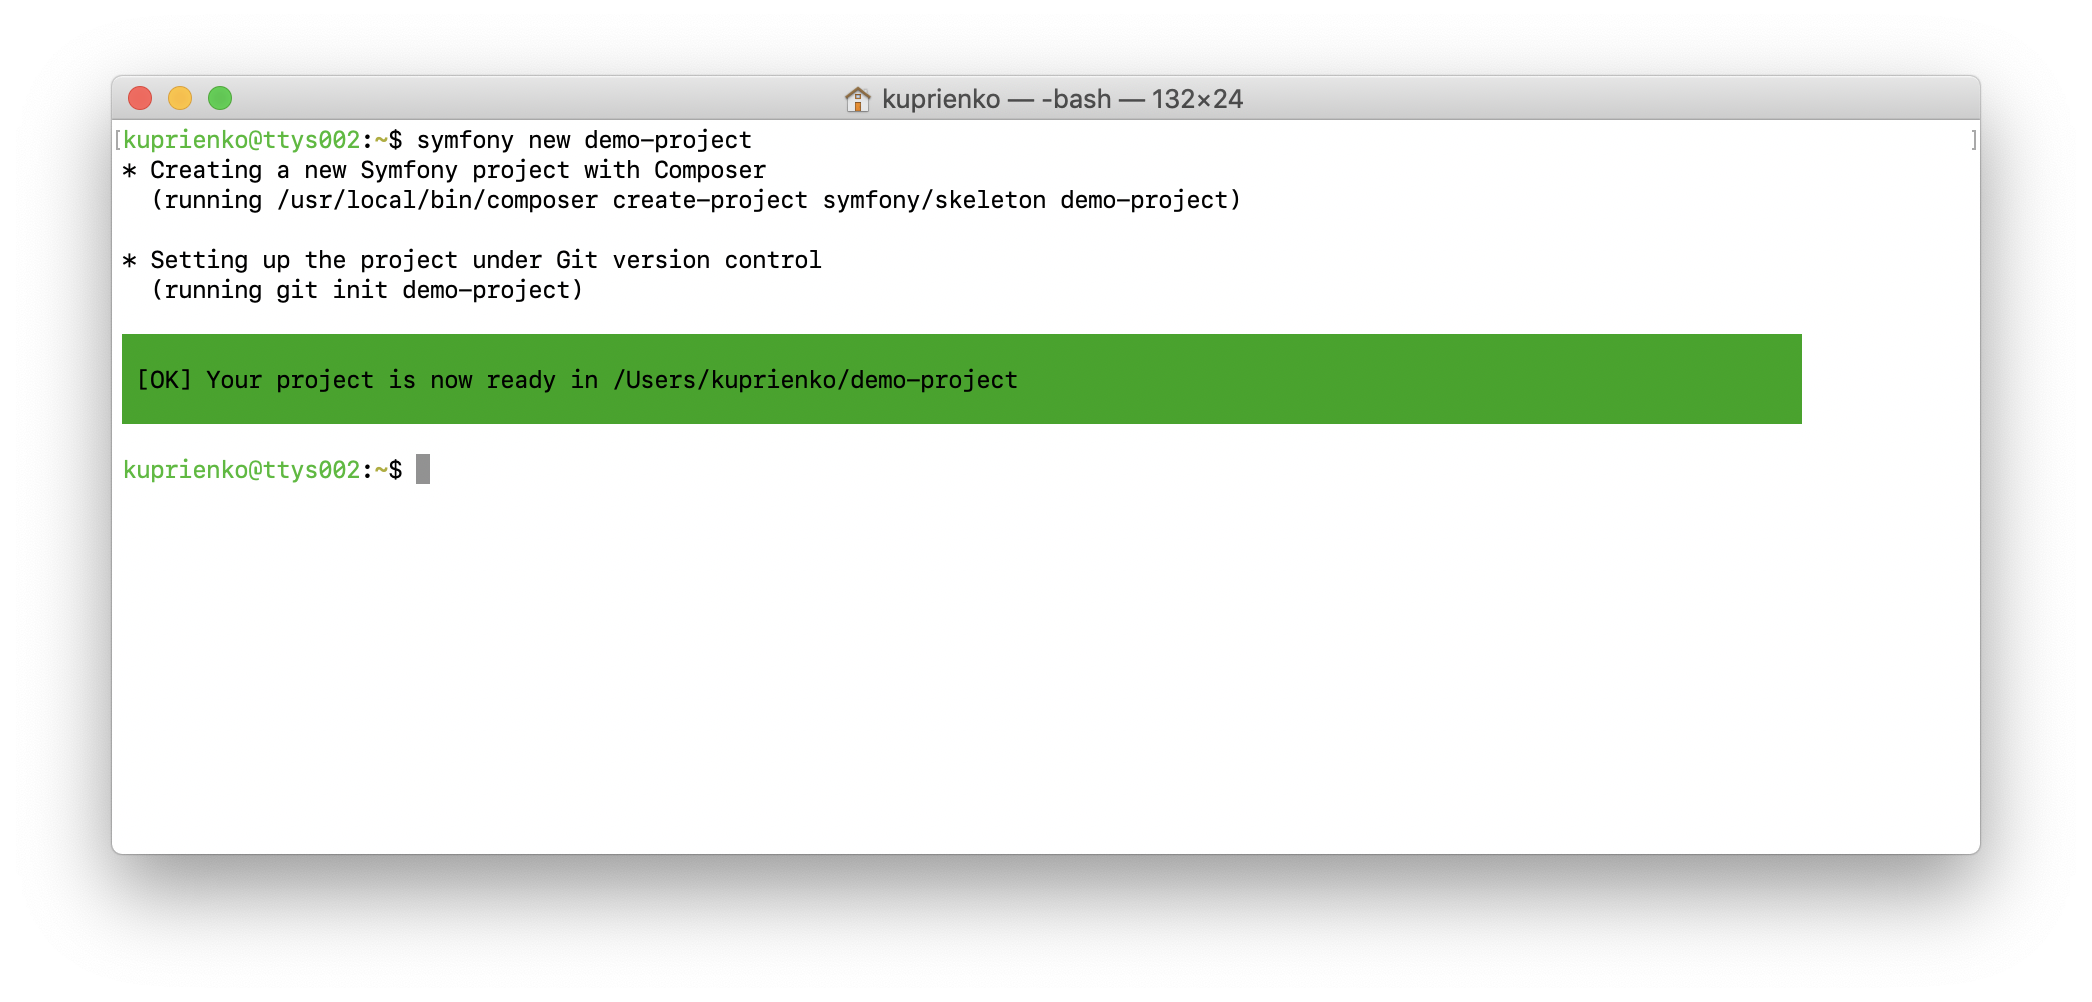
Чтобы создать новый Symfony проект, основанный на одном из официальных шаблонов, нужно запустить команду:
$ symfony new [--full | --demo] <path-to-project>
По умолчанию используется минимальный шаблон skeleton. Чтобы установить website-skeleton нужно запустить команду с опцией --full. Соответственно, для установки demo проекта необходимо запускать команду с опцией --demo.
Под капотом symfony new выполняет команду composer create-project, затем инициализирует новый Git репозиторий и сразу создаёт Initial commit.
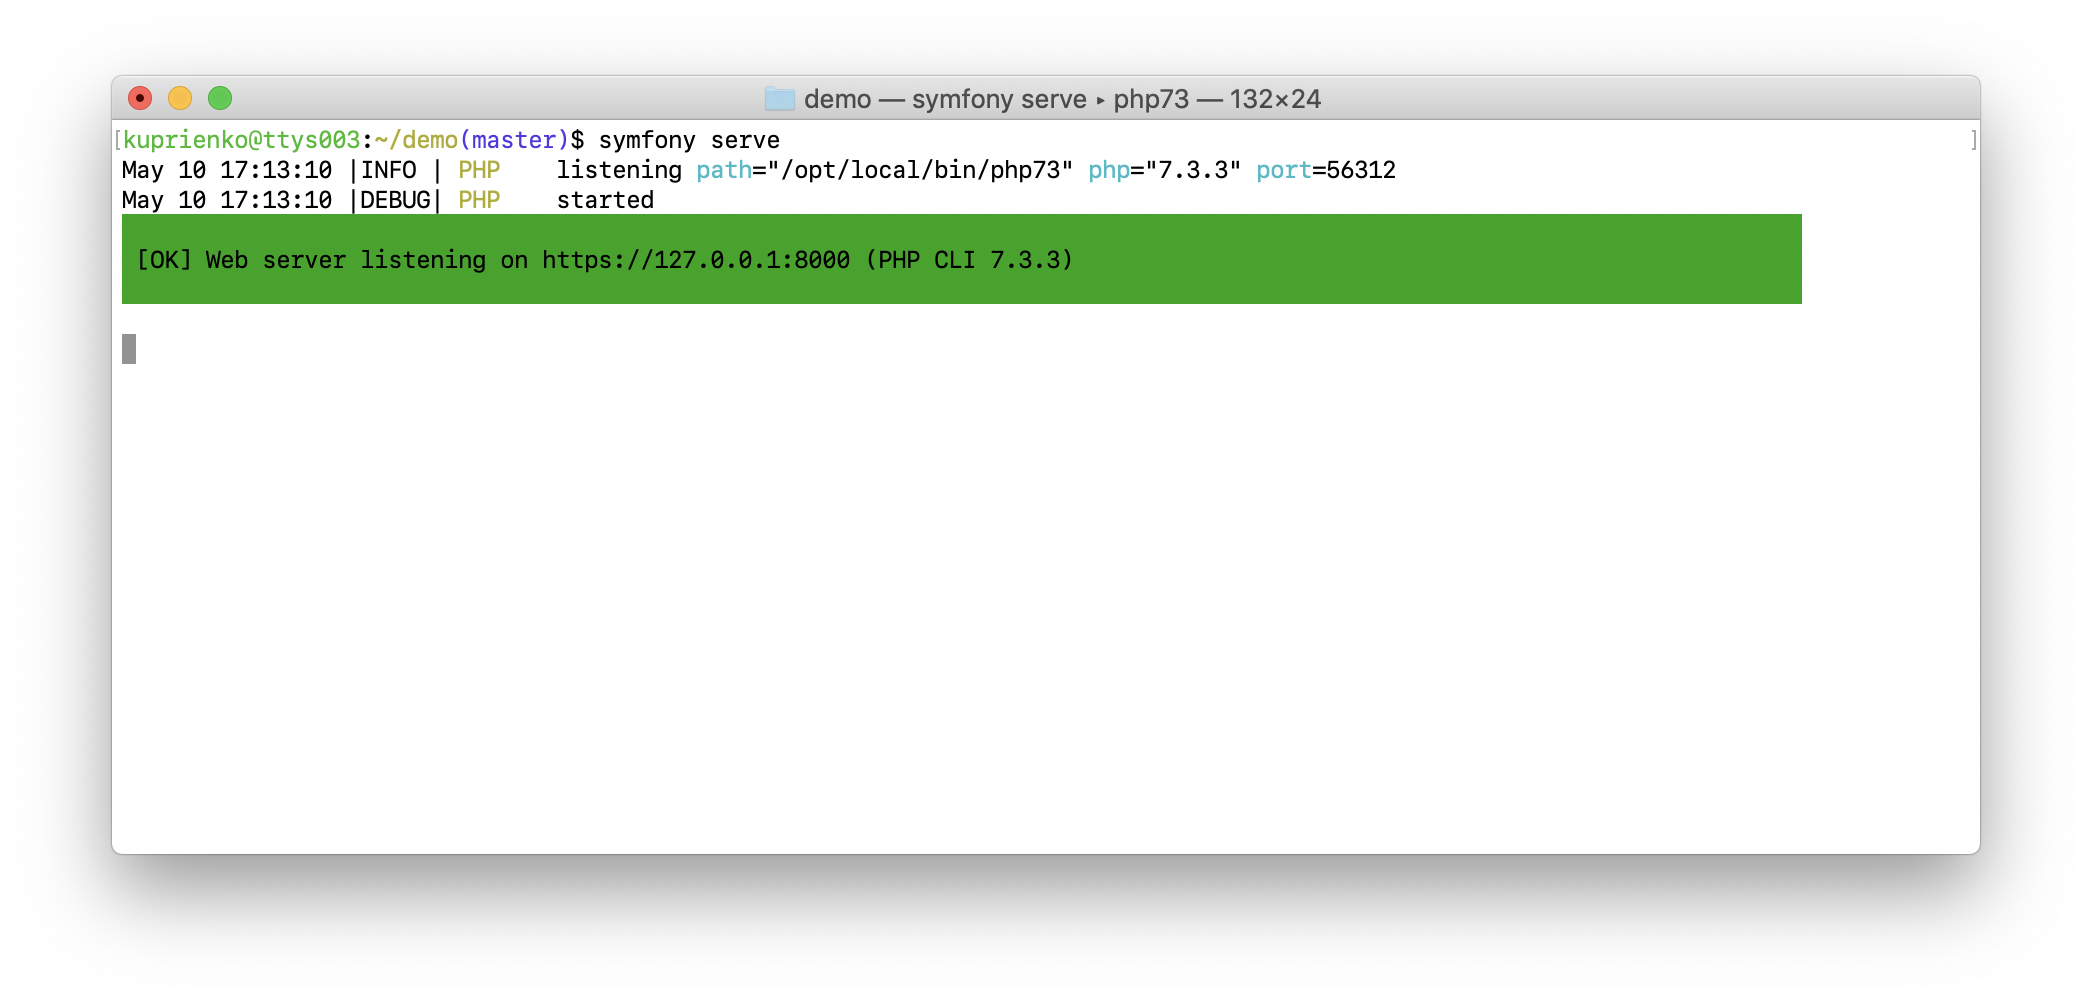
Локальный сервер
Для запуска сервера достаточно в корне приложения запустить команду
$ symfony serve
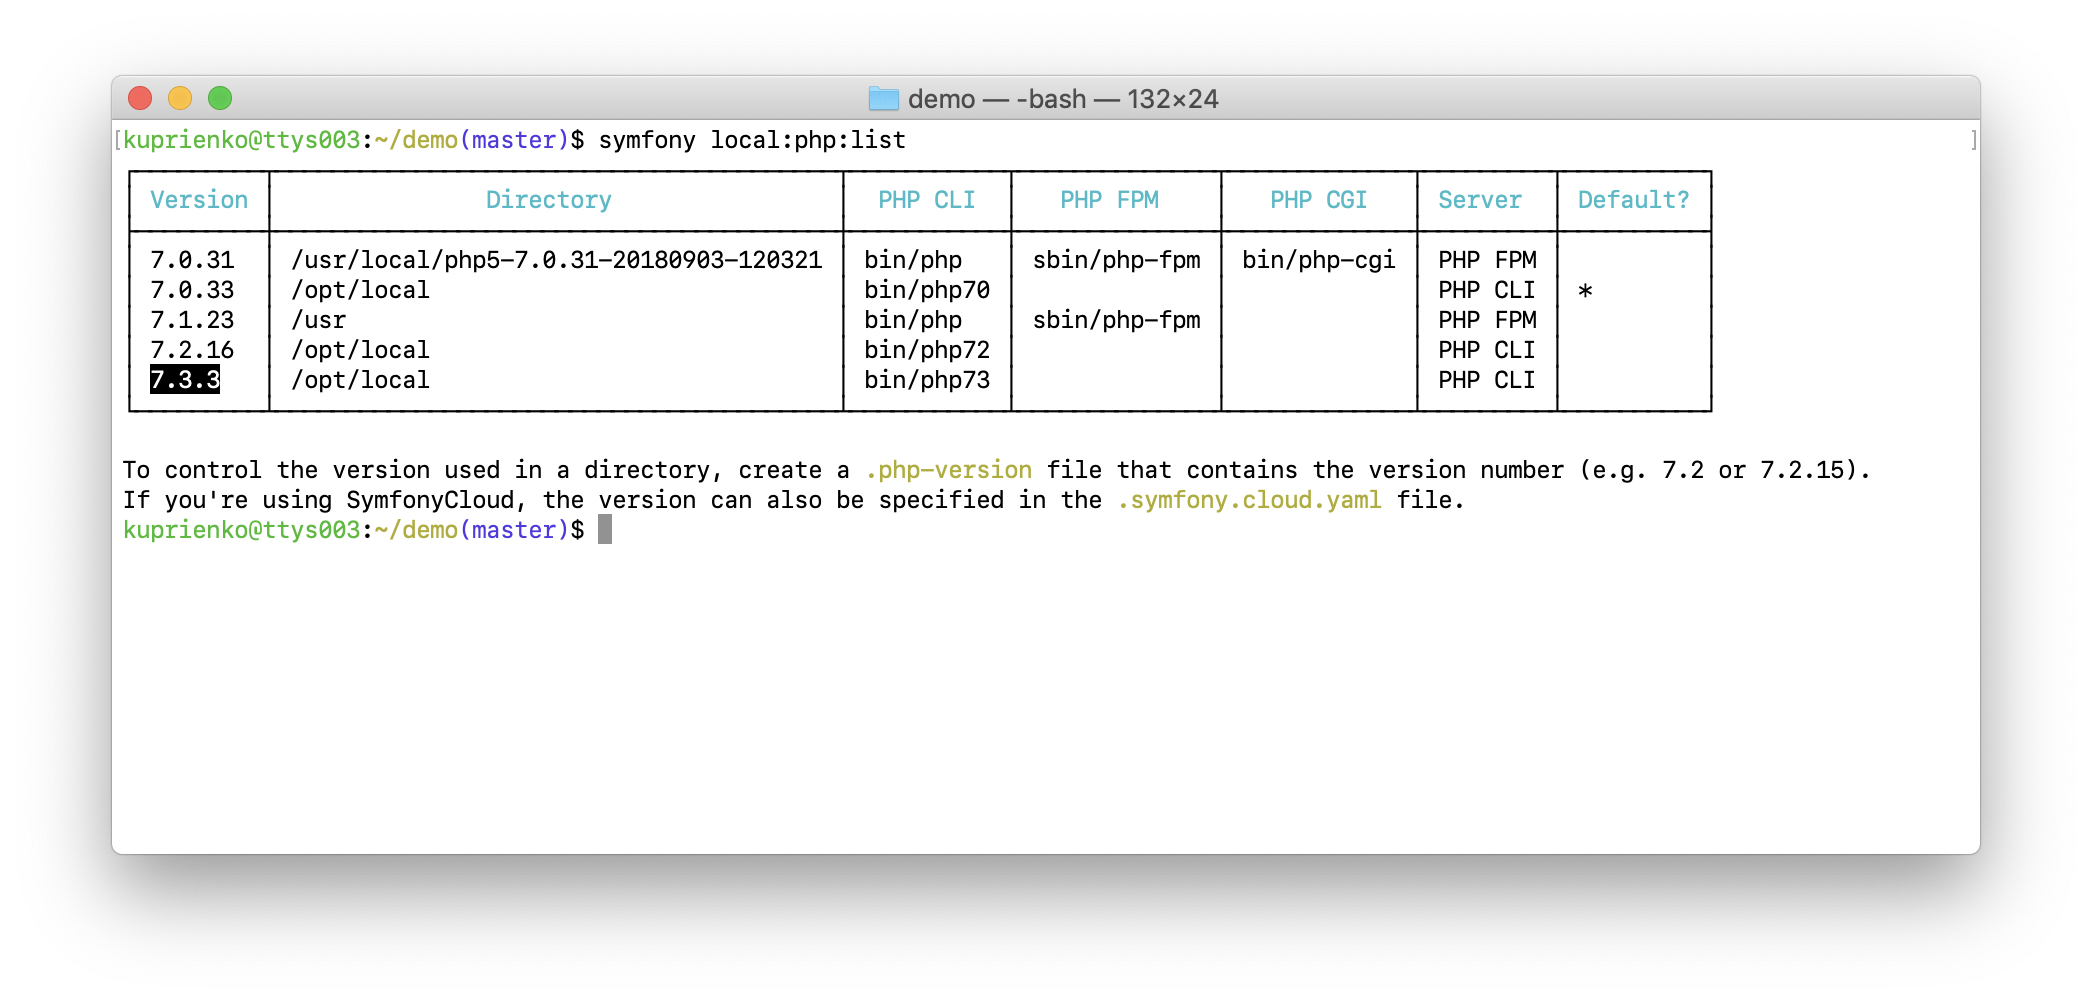
она проанализирует доступные SAPI на используемой машине и выберет лучший вариант из существующих, пользуясь следующими приоритетами: на первом месте PHP FPM, дальше PHP CGI и в конце PHP CLI. Список доступных SAPI можно посмотреть командой:
$ symfony local:php:list
После этого команда запустит сервер, который будет доступен по адресу 127.0.0.1 и подберёт свободный порт начиная с 8000.
По умолчанию сервер запускается в интерактивном режиме. Мы сразу видим логи сервера и приложения, но наш терминал заблокирован. Сервер можно запустить в режиме демона. Для этого нужно добавить опцию -d при запуске команды symfony serve.
Логи можно будет посмотреть, запустив команду:
$ symfony server:log
также можно посмотреть статус запущеного сервера используя команду:
$ symfony server:status
чтобы остановить запущенный сервер используется команда:
$ symfony server:stop
UPD: Раньше для запуска сервера мы использовали пакет symfony/web-server-bundle. С появлением Symfony CLI этот пакет становится не очень актуальным, так как он умеет только запускать сервер, используя PHP CLI SAPI и не поддерживает HTTPS, доменные имена, PHP FPM SAPI и прочее.
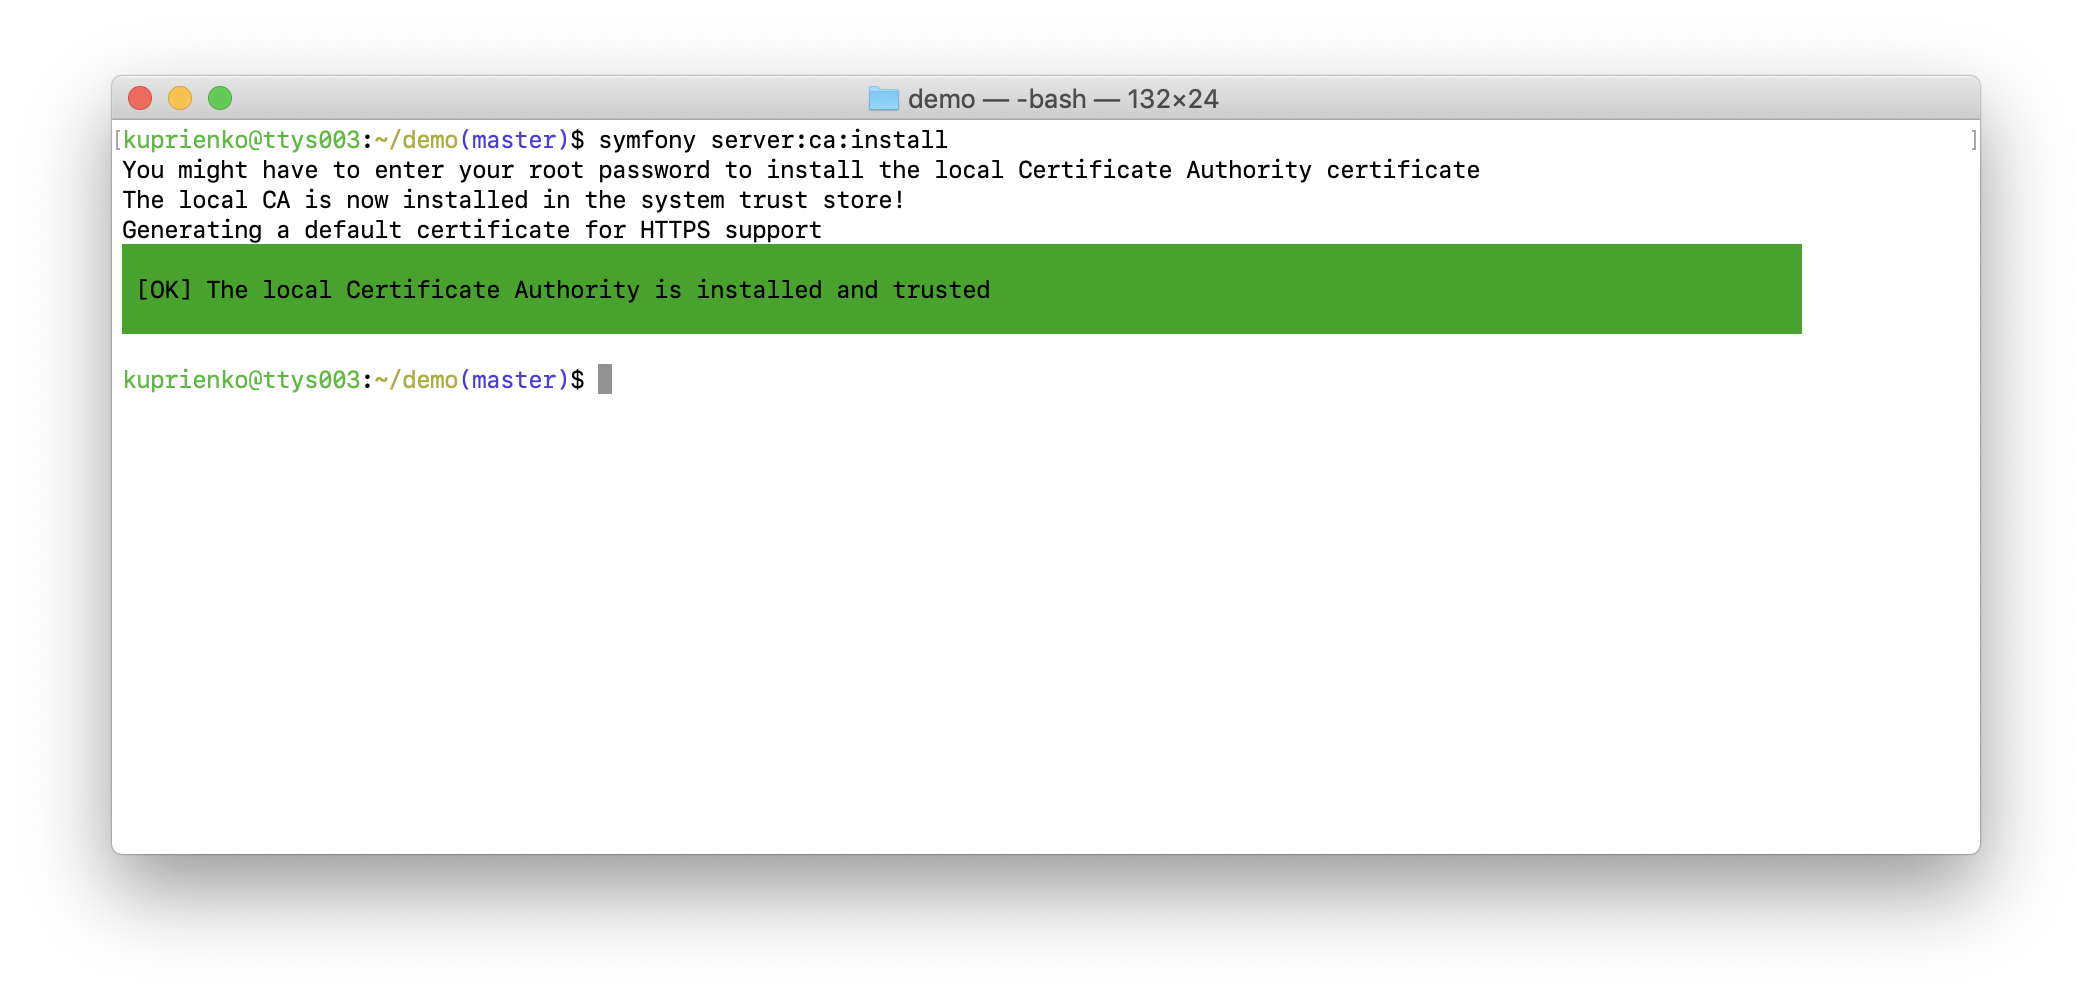
Поддержка TLS
Некоторые сторонние сервисы или библиотеки требуют отправлять запросы, используя HTTPS протокол. Symfony CLI предоставляет возможность очень легко настроить поддержку TLS, установив дополнительные компоненты, с помощью следующей команды:
$ symfony server:ca:install
после чего достаточно перезапустить ваш браузер и вуаля — поддержка TLS настроена! Запускаете сервер командой symfony serve и можно перейти на сайт по HTTPS протоколу.
Мне не совсем нравится открывать все проекты по адресу https://127.0.0.1:8000 или https://localhost:8000, а вам? Это приносит свои неудобства: если запущено несколько проектов одновременно — нужно запоминать на каком порту какой проект работает; при перезапуске сервера порты могут меняться и т.п.
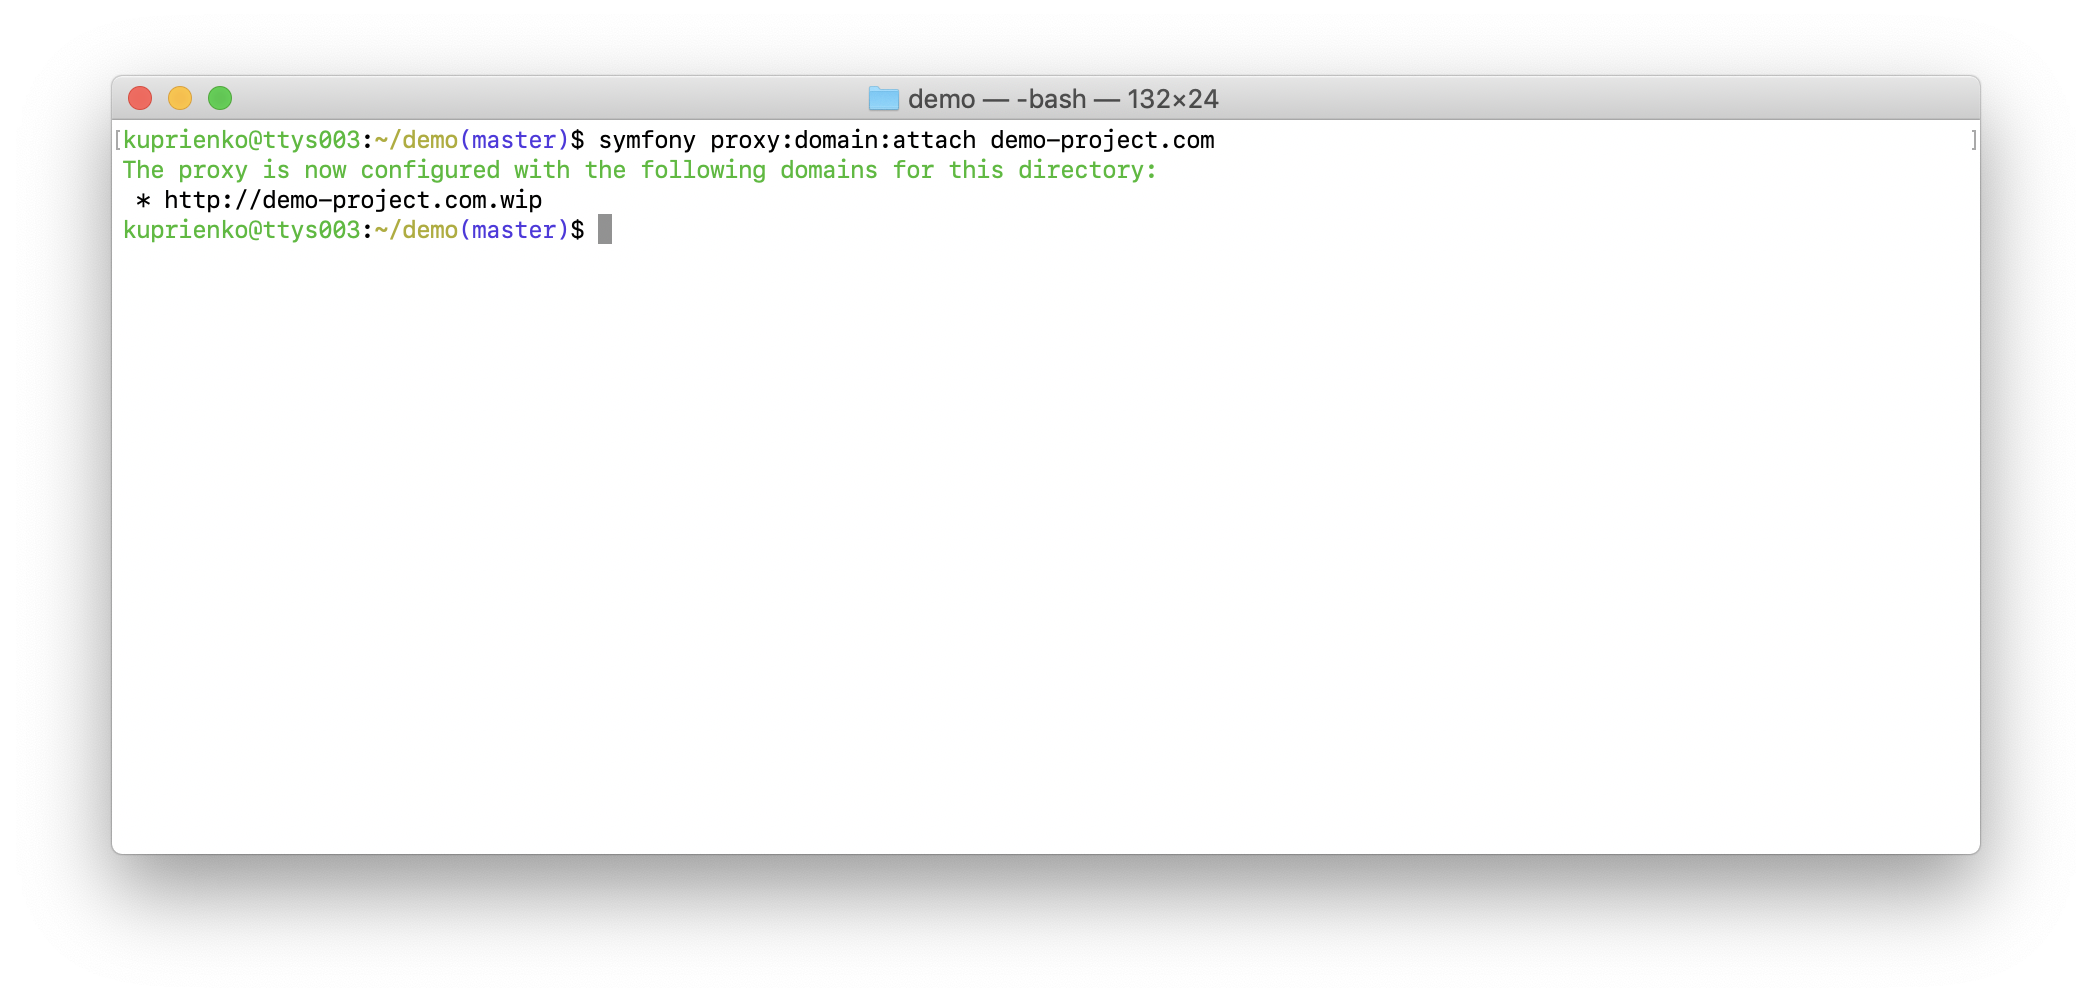
Symfony CLI решает и этот вопрос! Он предоставляет для нас proxy-сервер, с помощью которого можно создавать красивые доменные имена. Для этого нужно привязать к нашему проекту желаемое домменое имя с помощью команды:
$ symfony proxy:domain:attach <domain-name>
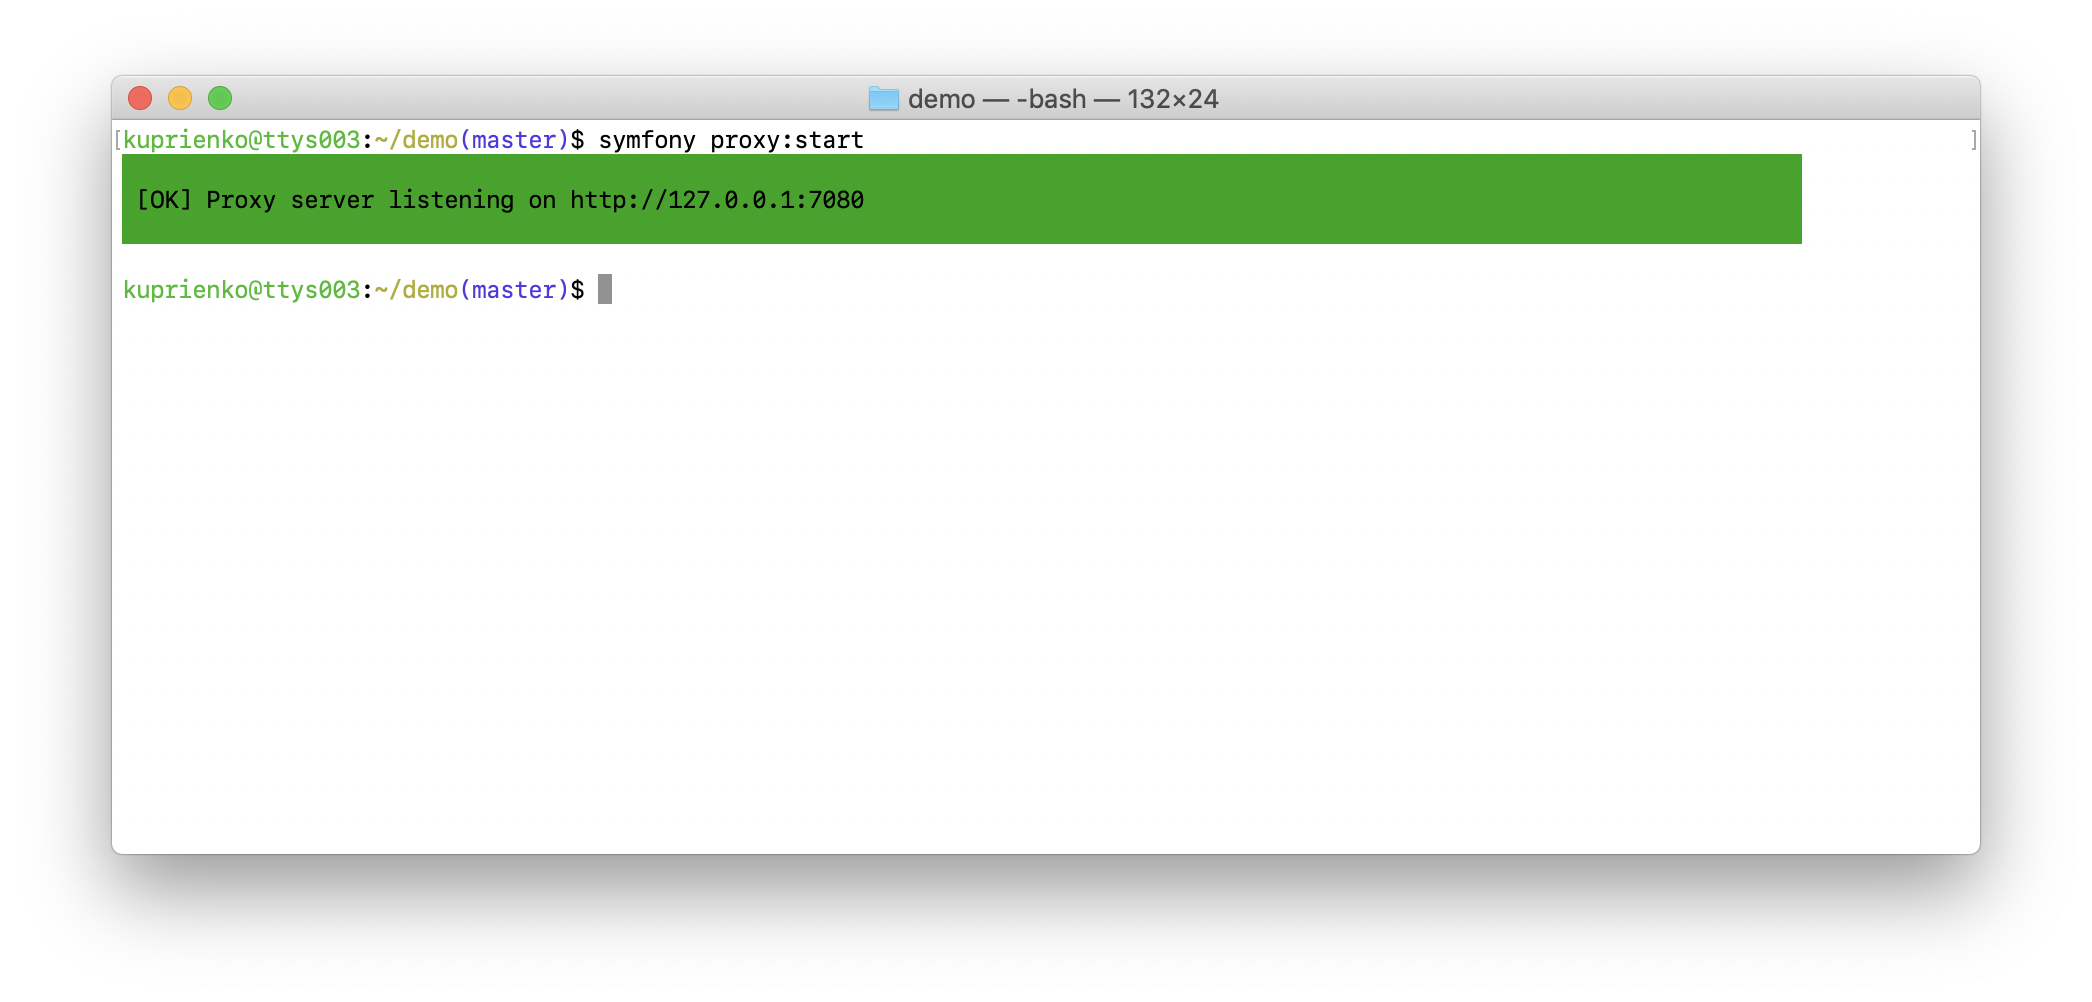
таким образом домен demo-project.com привязался к директории с проектом. Далее нам нужно запустить proxy-сервер командой:
$ symfony proxy:start
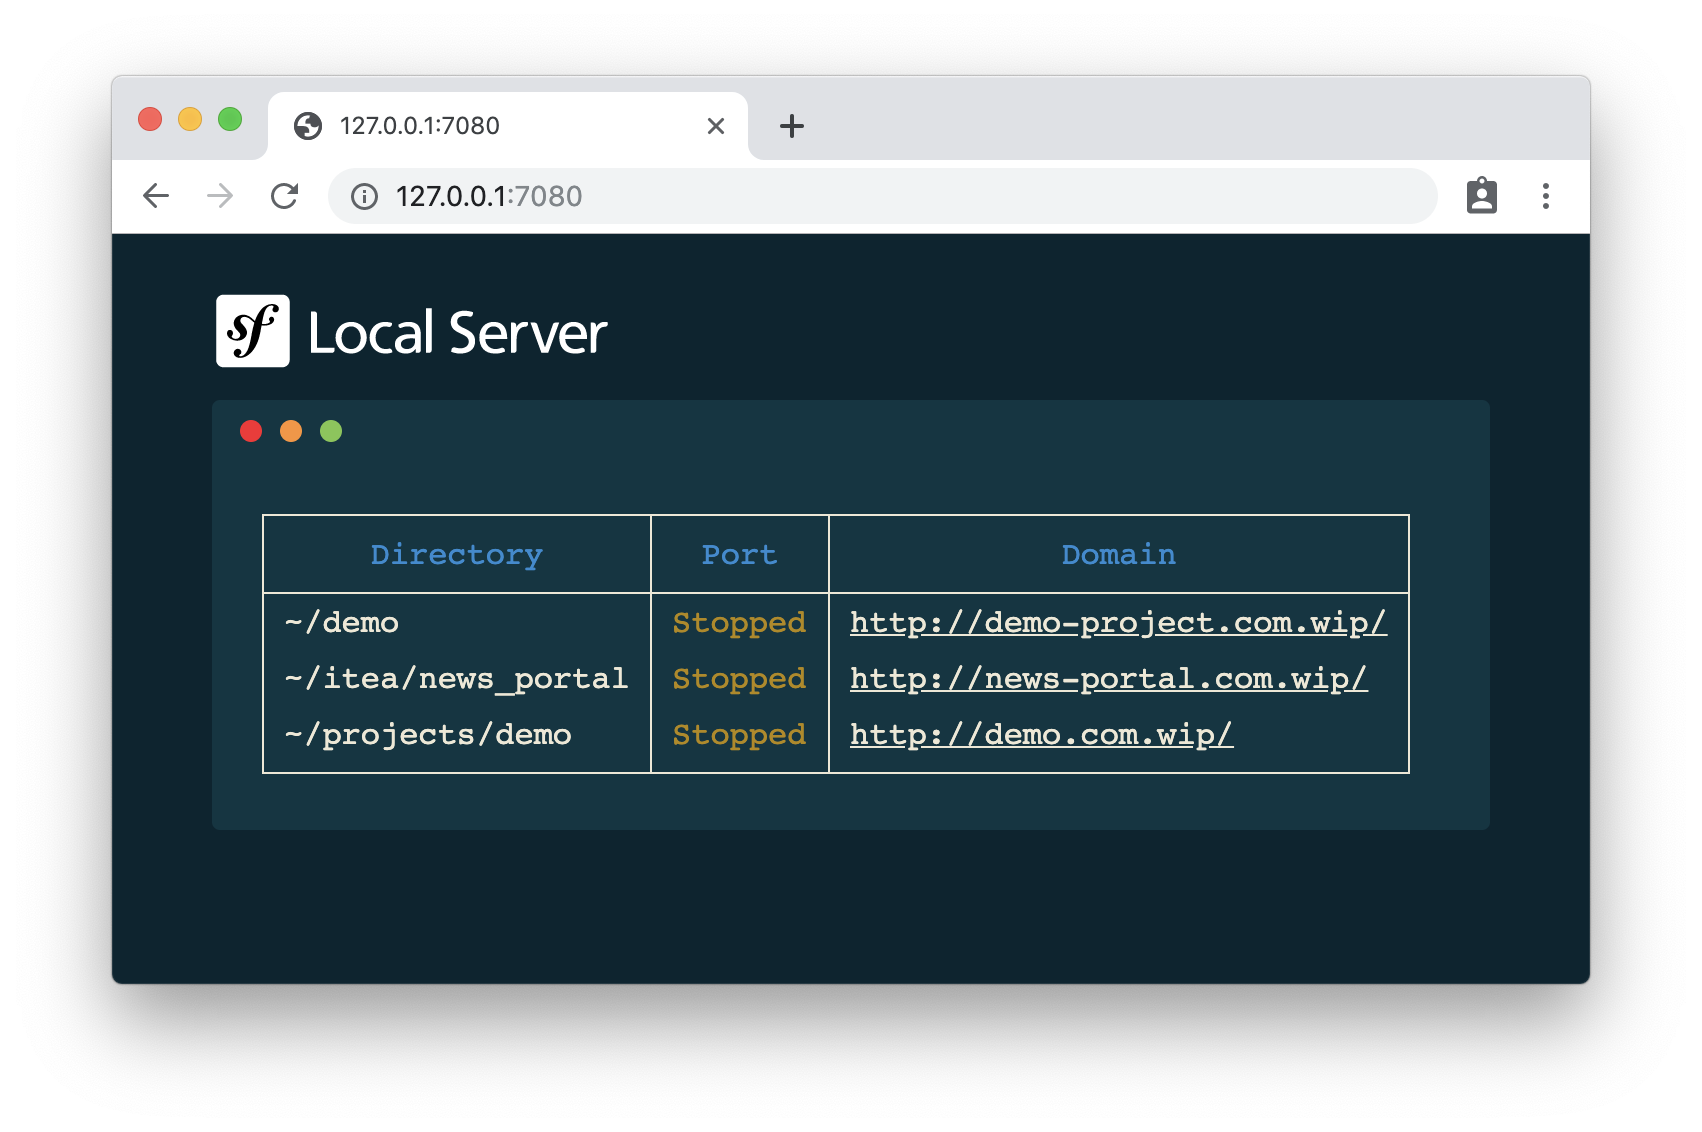
Мы запустили proxy-сервер в режиме демона и он доступен у нас по адресу http://127.0.0.1:7080, можем открыть его в браузере:
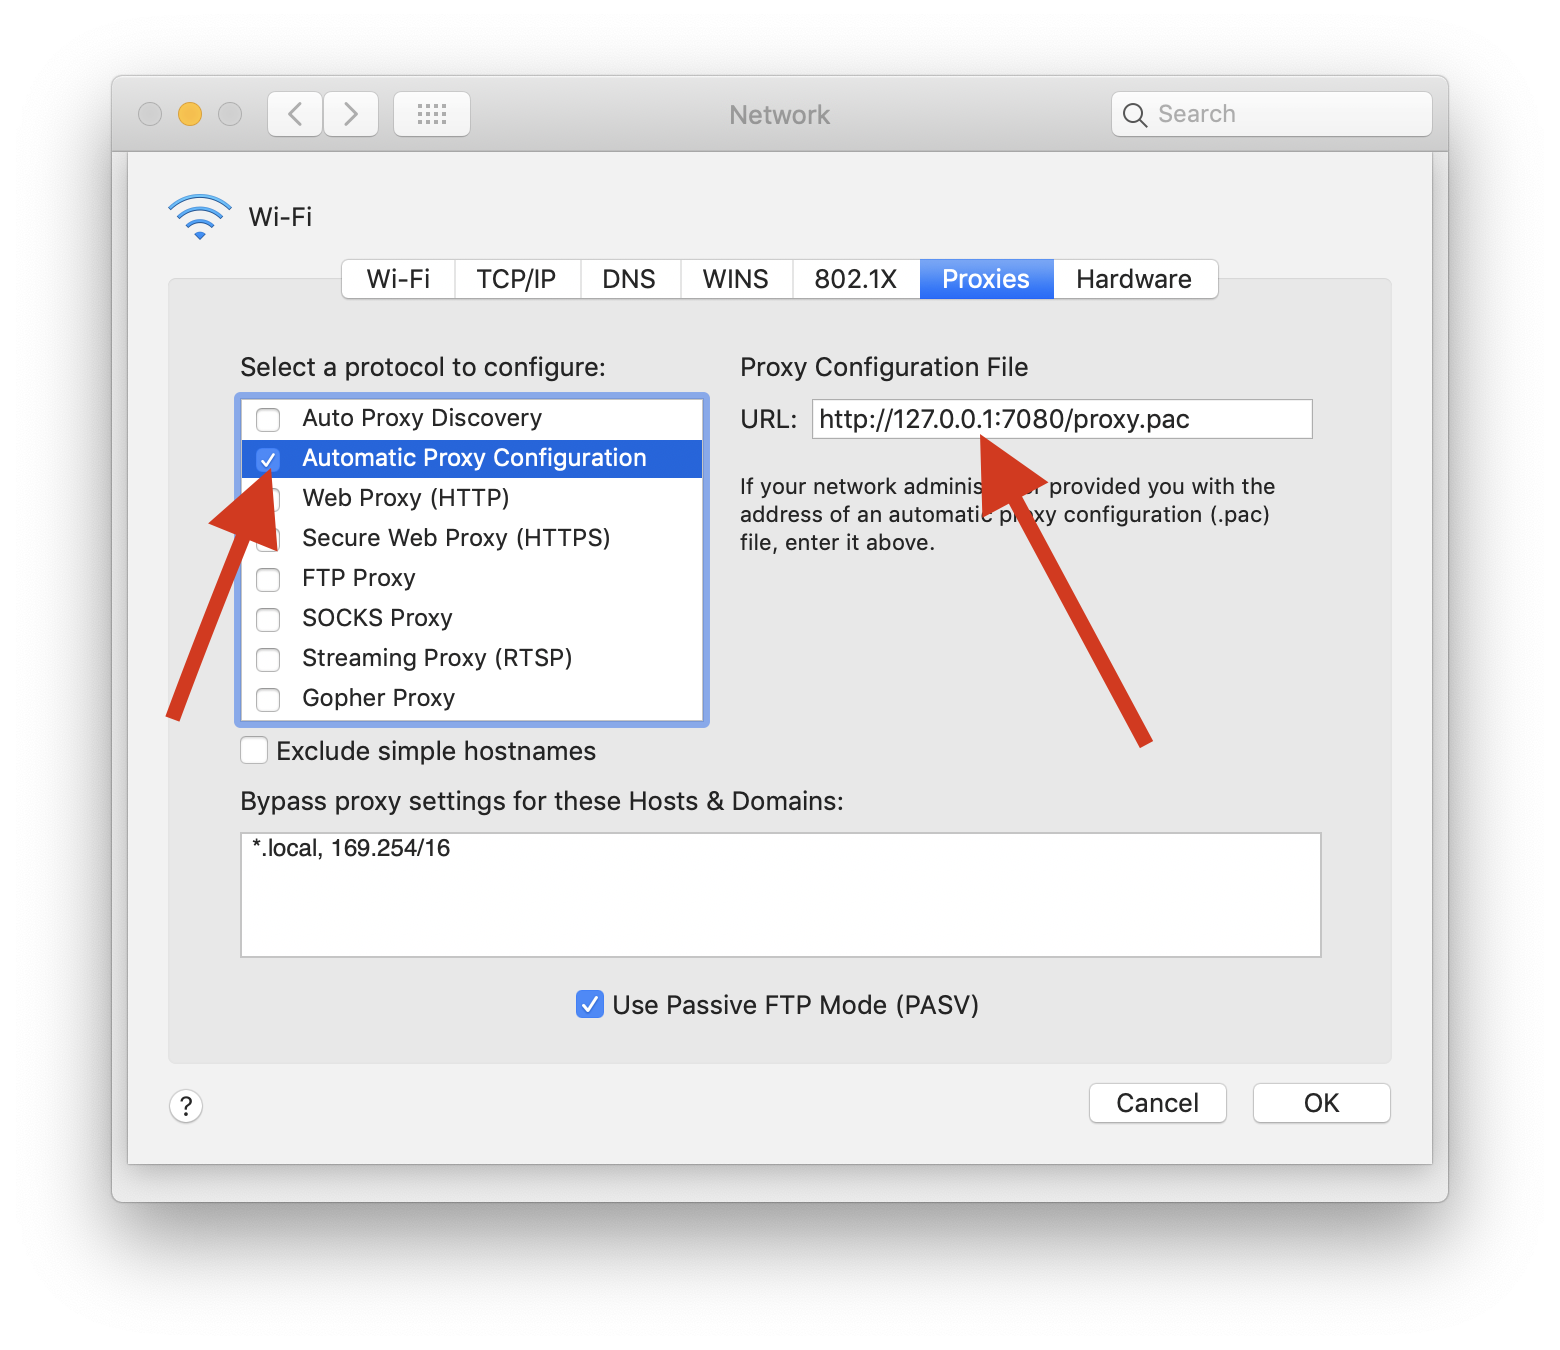
где увидим список доменов, пути к проектам в файловой системе и статус сервера для каждого проекта. На данном скриншоте видно то, что все сервера находятся в статусе Stopped, то есть они пока не запущены. Следующим шагом нам нужно добавить этот proxy-сервер в настройки ОС
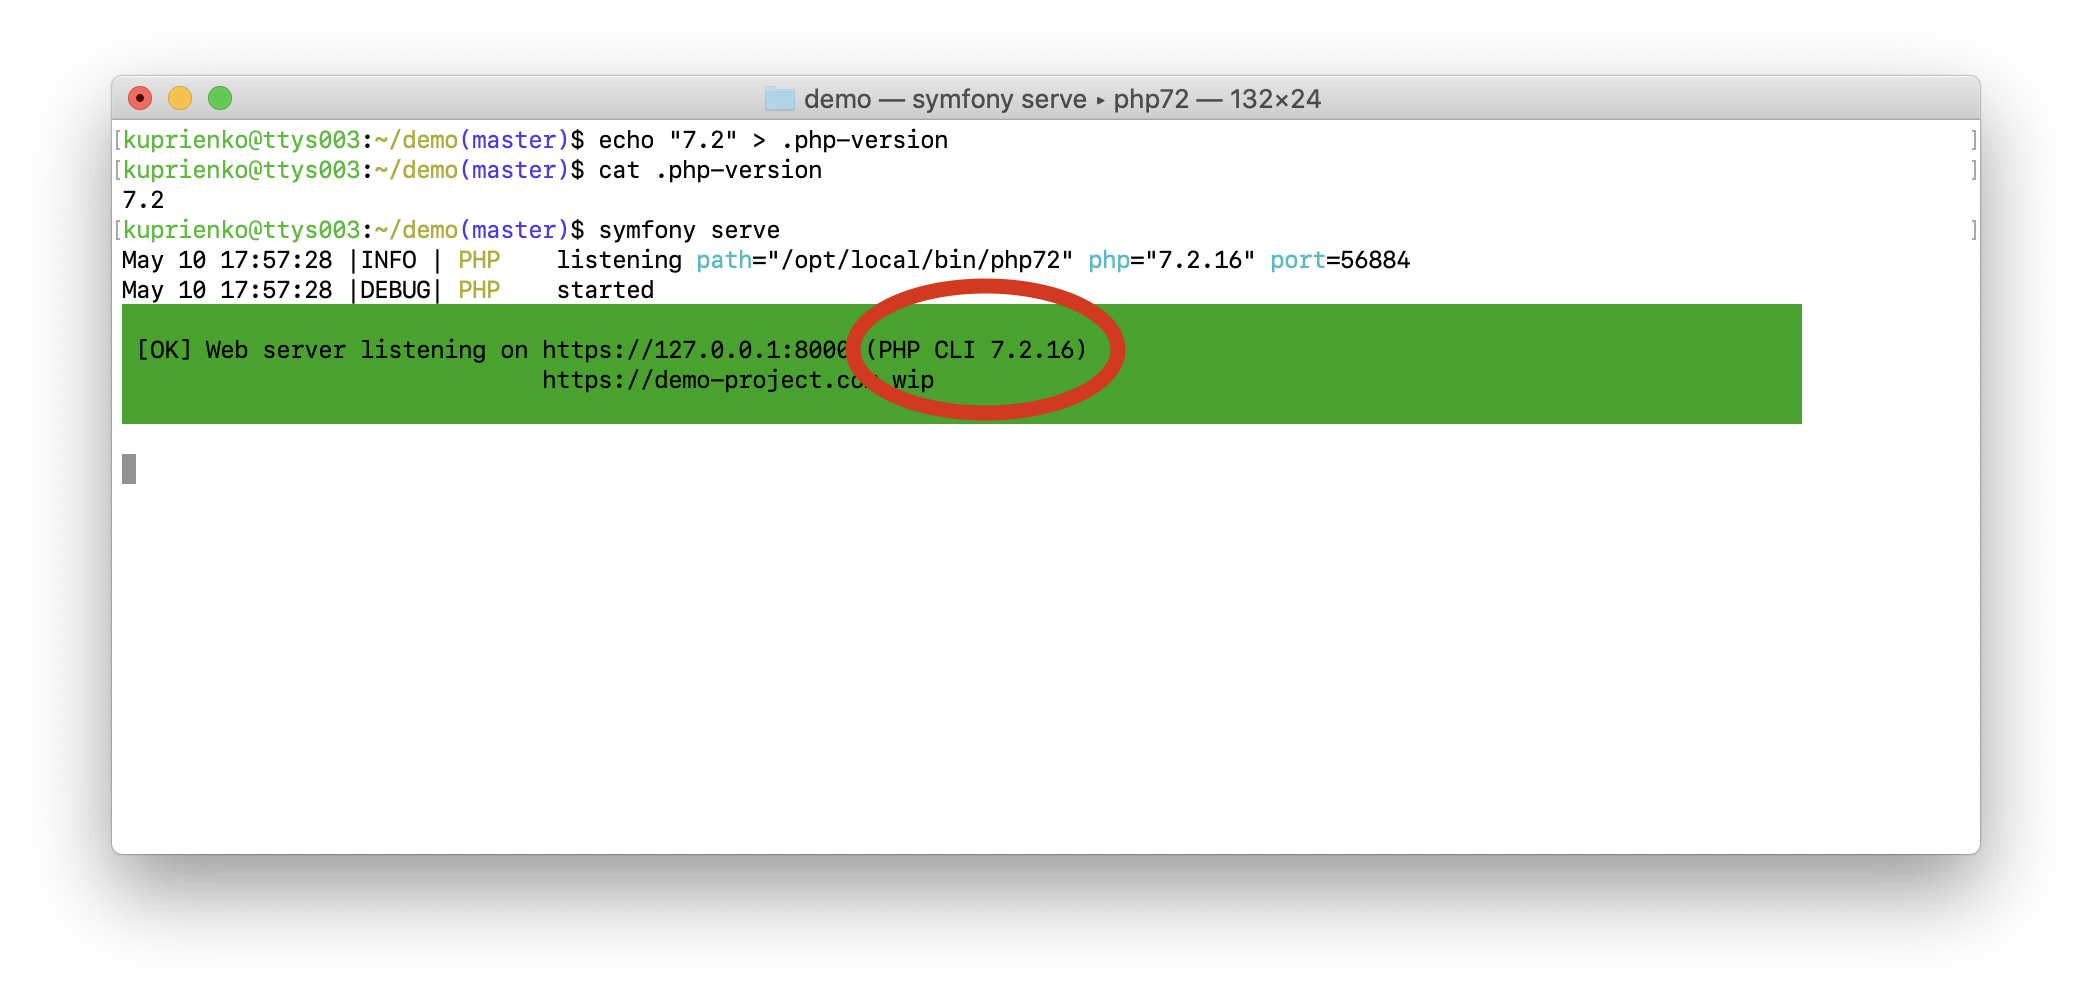
На этом настройка proxy-сервера заканчивается, далее нужно запустить сервер уже известной нам командой symfony serve. Помимо IP-адреса с портом мы увидим наше доменное имя, по которому можем перейти в браузере! Ко всем доменным именам добавляется постфикс .wip.
То есть в случае использования proxy-сервера flow запуска проекта немного меняется:
Запускаем proxy-сервер
$ symfony proxy:start
Запускаем сервер для приложения
$ symfony serve
Для завершения работы с проектом “зеркалируем” действия, описанные выше:
Останавливаем сервер
$ symfony server:stop
Останавливаем proxy-сервер
$ symfony proxy:stop
Для упрощения данных операций рекоммендую использовать утилиту GNU Make.
Переключение версий PHP
Если вы используете разные версии PHP на разных проектах, вы наверняка сталкивались с проблемой переключения между версиями. Было бы здорово иметь какой-то автоматический инструмент для этого, не так ли? Symfony CLI умеет решать и эту проблему! Вам достаточно создать файл .php-version в корне проекта и в качестве содержимого указать желаемую версию.
$ echo "7.2" > .php-version
Как видно на скриншоте выше, Symfony CLI прочитал файл .php-version и запустил сервер, используя версию, указанную в этом файле.
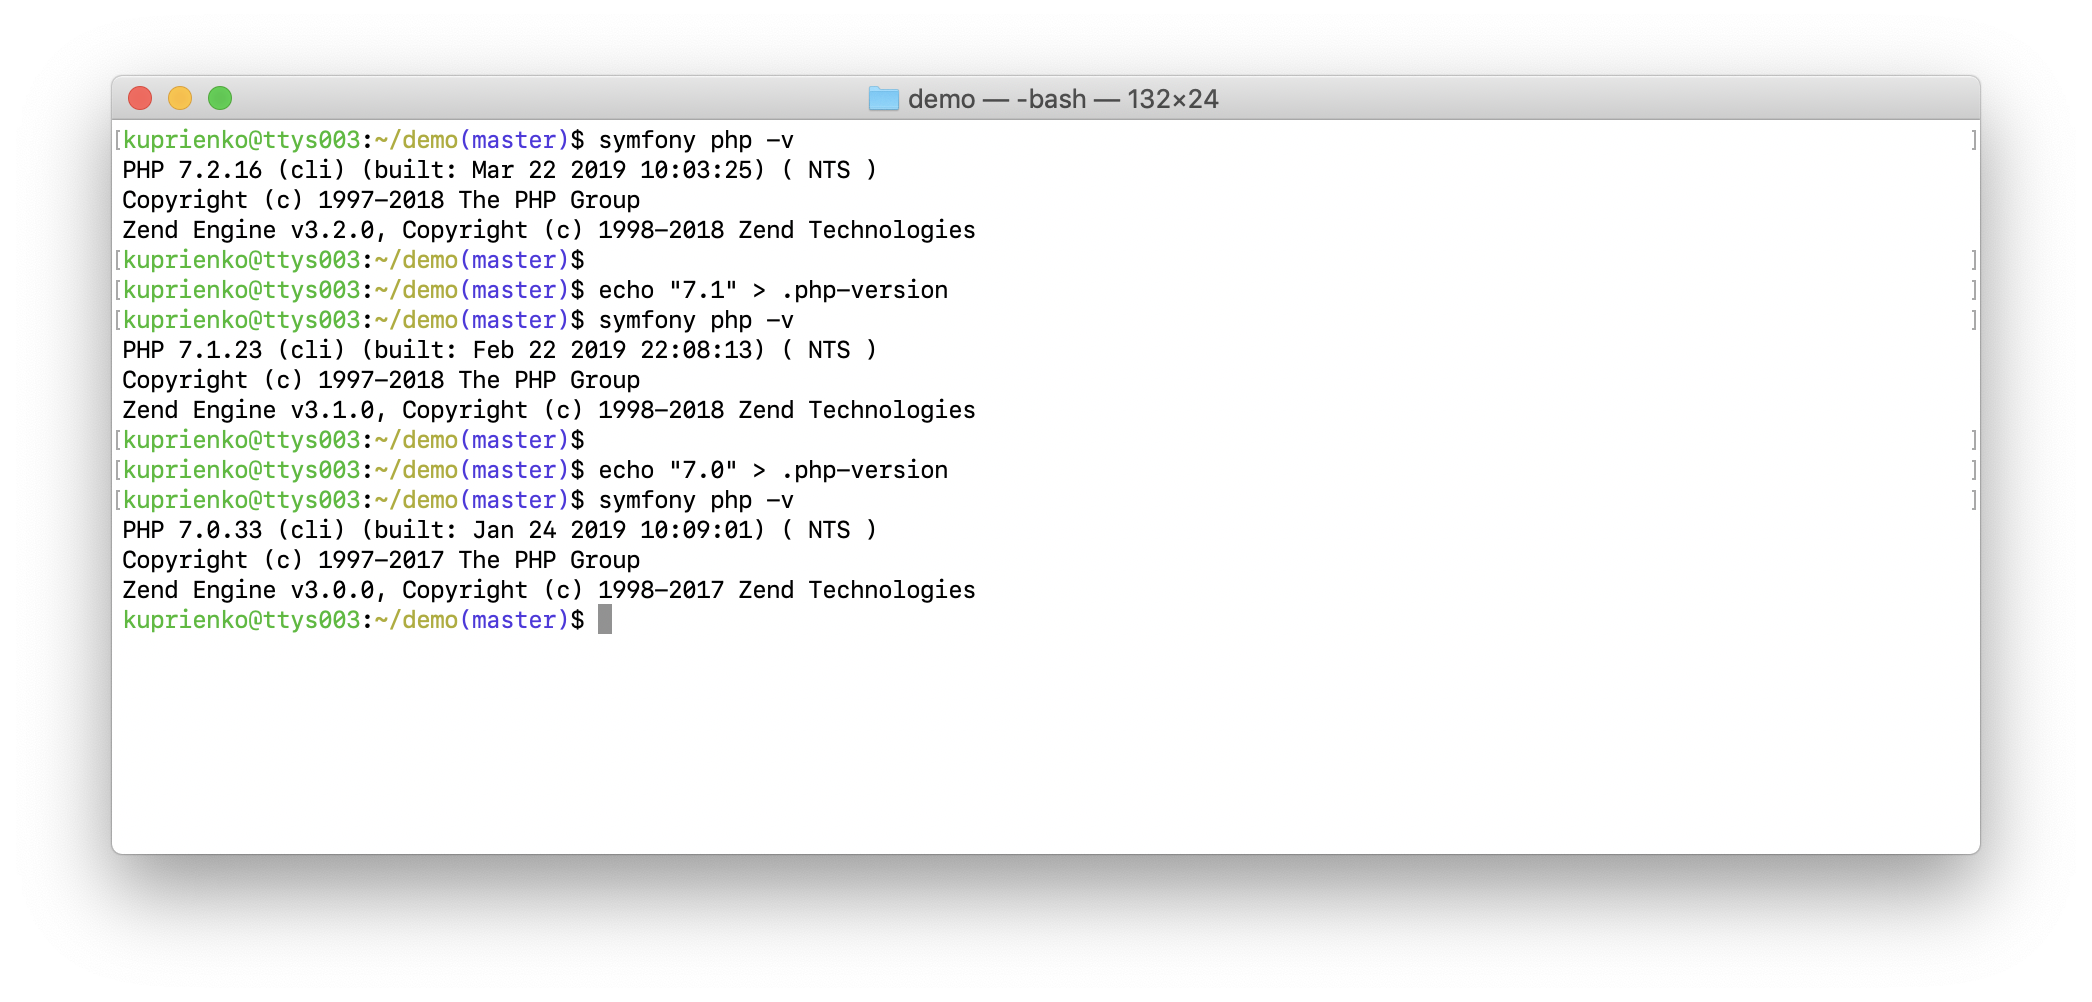
Так же Symfony CLI предоставляет нам обёртку над PHP CLI, которая тоже учитывает версию PHP, указанную в файле .php-version. То есть если вам нужно вызывать консольные скрипты, например bin/console — используйте её.
$ symfony php
Для удобства можно создать алиас для этой команды, чтобы сэкономить время и избежать ошибок в написании команды. К примеру, я создал для себя алиас sphp:
Symfony CLI предоставляет аналогичную обёртку для Composer, поэтому с ним у вас также не возникнет никаких проблем. Для удобства можно создать алиас и для этой обёртки. У меня это scomposer:
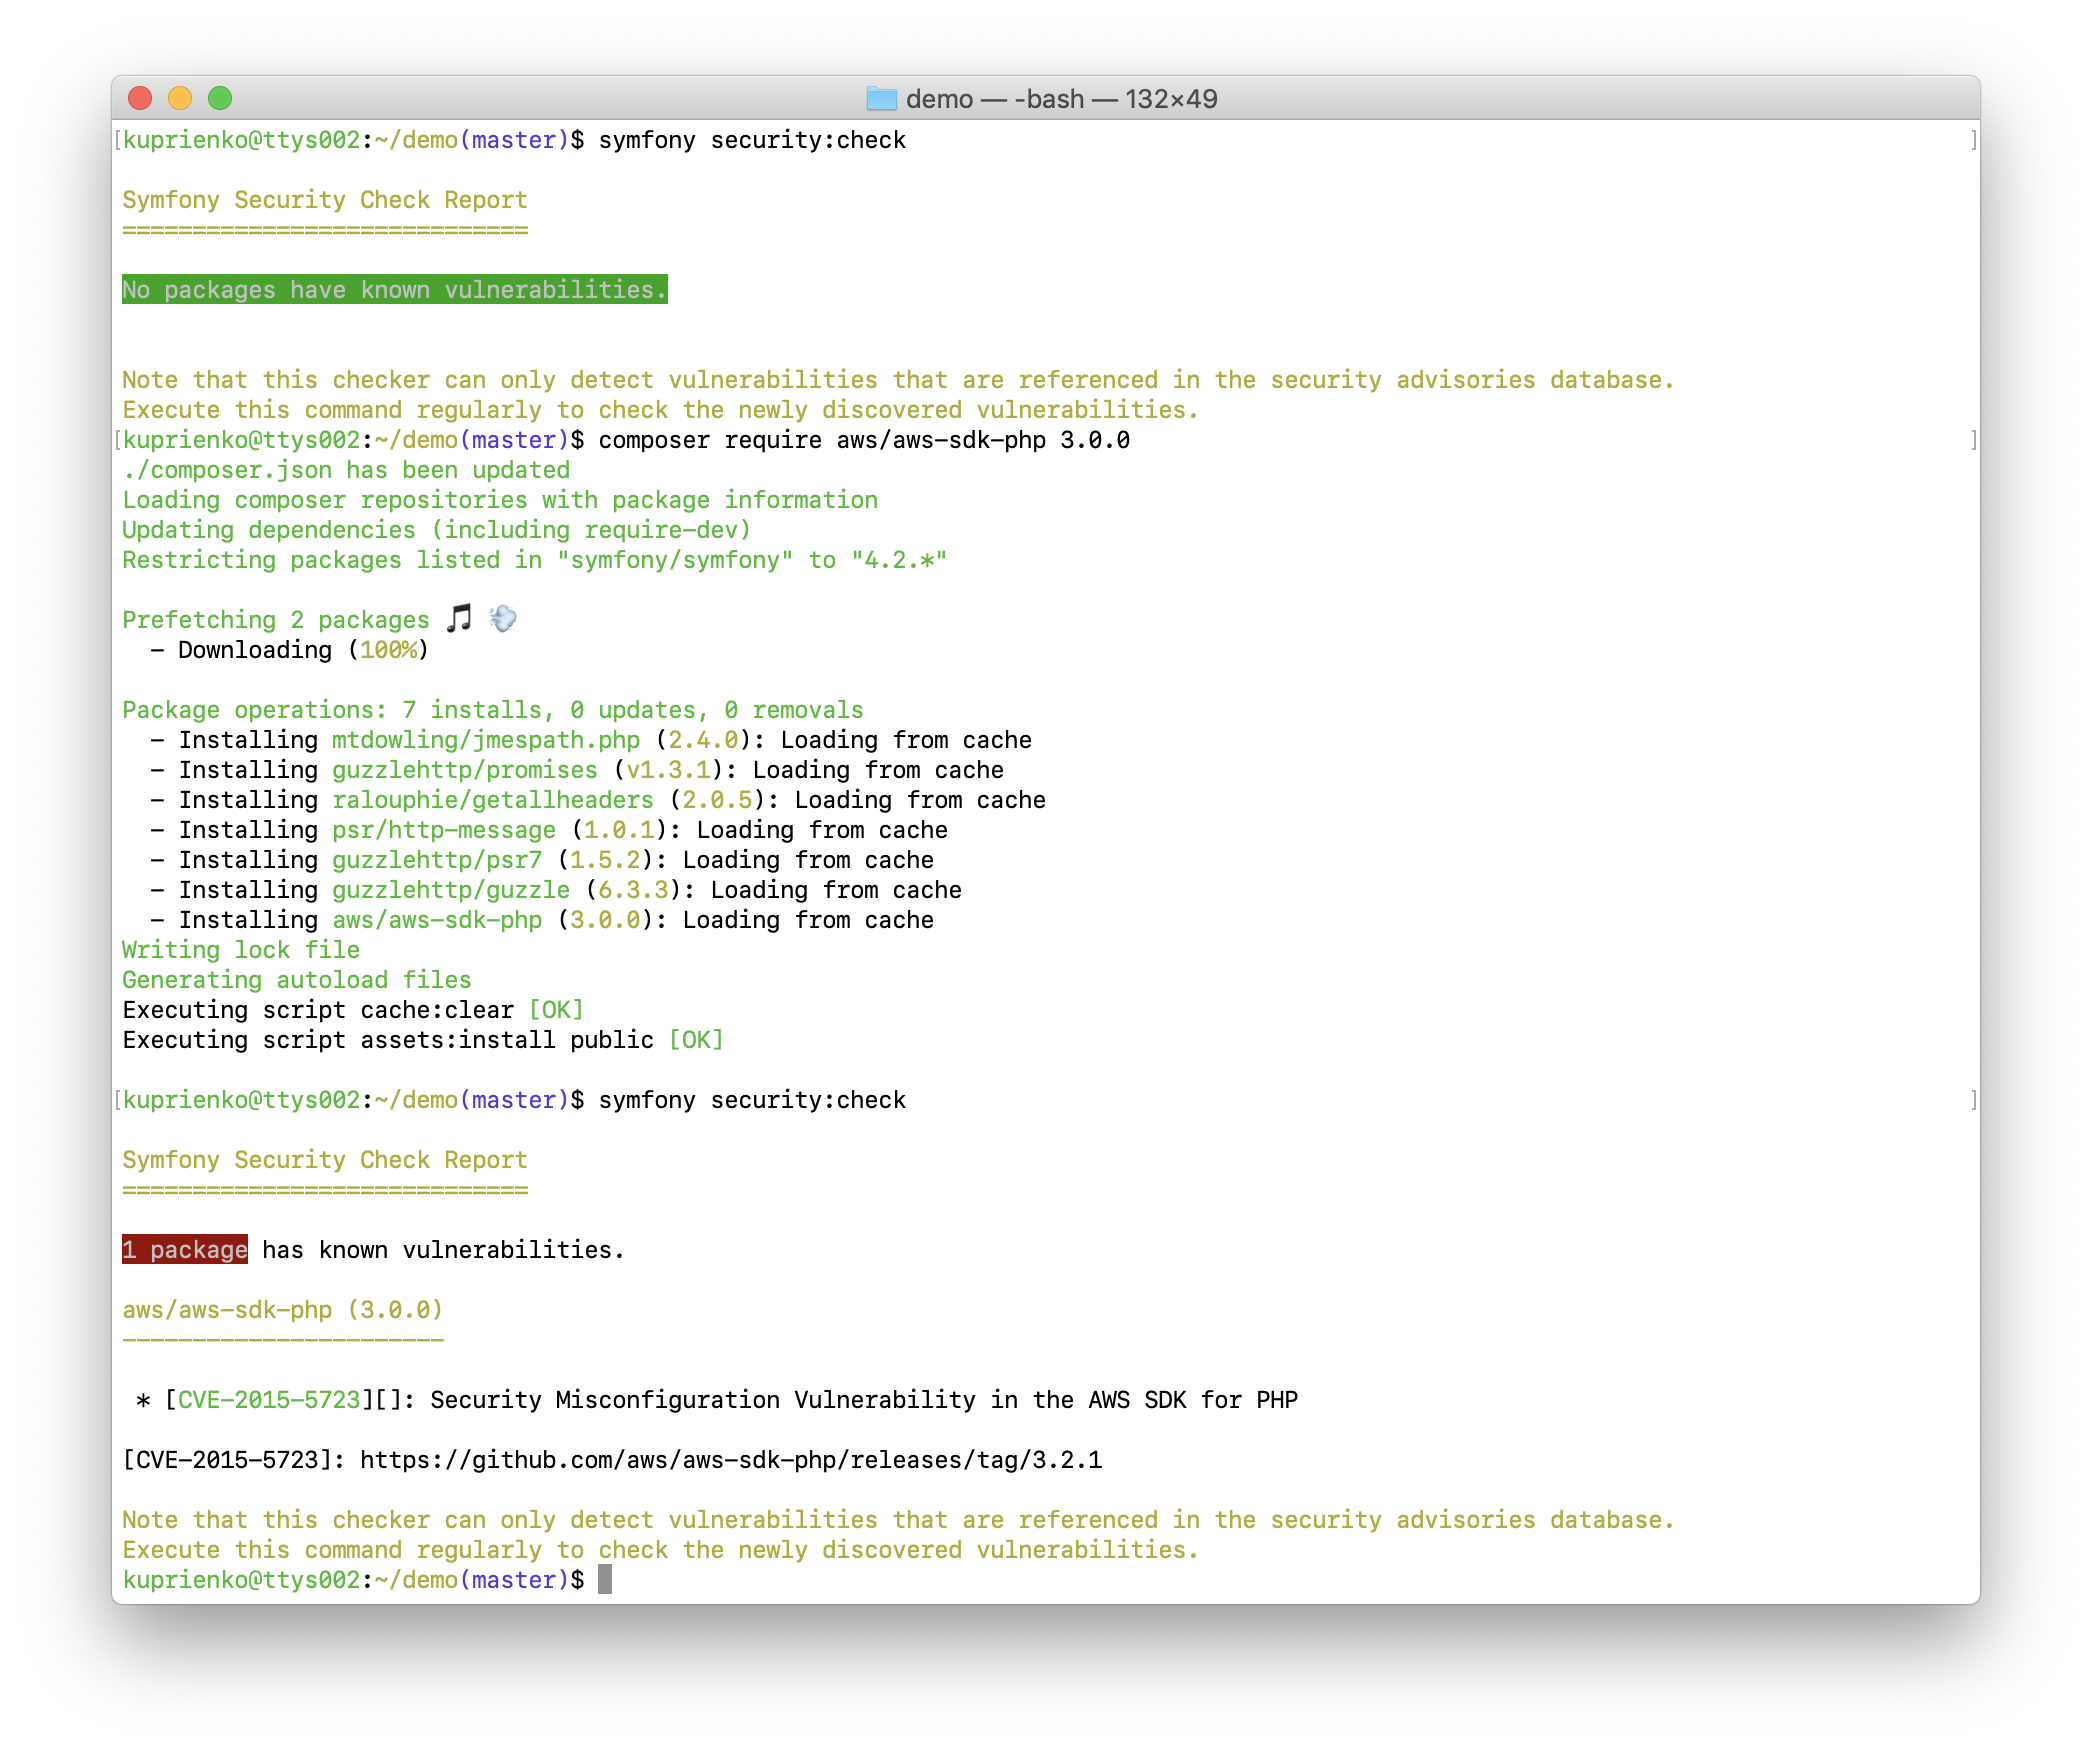
В качестве бонуса Symfony CLI предоставляет команду для проверки на наличие уязвимых composer-пакетов в вашем проекте. Больше не прийдётся устанавливать в проект зависимость Symfony Security Checker. Так же официальная документация говорит о том, что версия встроенная в Symfony CLI работает оптимальнее за счёт того, что она не делает HTTP запросы на официальный API. Запустить проверку можно командой:
Your system must meet the following requirements to be able to run the latest version of Laravel:
PHP> = 7.1.3 with OpenSSL, PDO, Mbstring, Tokenizer, XML, Ctype and JSON PHP Extensions.
Composer is an application-level package manager for PHP.
Setting prerequisites
First, make sure you update your system sources and existing software packages using the following commands.
$ sudo apt-get update
$ sudo apt-get upgrade
Installing LAMP Stack on Ubuntu
Then set up a running LAMP environment (Linux, Apache, MySQL and PHP), if you already have it, you can skip this step or install the LAMP stack using the following commands on your Ubuntu system.
You may also need to create a MySQL database for your Laravel application project using the following commands.
$ mysql -u root -p
mysql> CREATE DATABASE laravel;
mysql> GRANT ALL ON laravel. * to ‘laravel’ @ ‘localhost’ IDENTIFIED BY ‘secret_password’;
mysql> FLUSH PRIVILEGES;
mysql> quit
Now open your .env config file and update your database settings as shown below:
Now go to the default virtual host config file in Apache /etc/apache2/sites-enabled/000-default.conf and update the DocumentRoot public directory in Laravel as shown below:
Now change the default virtual host configuration with the following content and also be sure to replace yourdomain.tld with your website’s domain name as shown below:
Adobe’s once-ubiquitous Flash Player, a browser-based runtime for displaying rich media content on the Internet, has reached the end of the road, with the company having made the final scheduled release of the technology for all regions outside mainland China.
The final release was made on December 8. Adobe will no longer support Flash Player after this month; Flash content will be blocked from running in Flash Player beginning on January 12, 2021.
Adobe advises all users to immediately uninstall Flash Player to protect their systems. In release notes, Adobe thanked customers and developers who have used the technology and created content leveraging it during the last two decades. An end-of-life general information page has been posted.
Adobe announced in July 2017 that it would discontinue Flash Player at the end of this year. Flash technology succumbed to perceptions of it as proprietary technology in an era when standards-based technologies such as HTML5 began to gather momentum. Adobe cited WebGL and WebAssembly as now-viable alternatives.
By giving three years’ advance notice, Adobe hoped to provide enough time for developers, designers, businesses, and others to migrate their Flash content to new standards. The timing of the Flash end-of-life was coordinated with major browser vendors.
Firefox users can expect improved JavaScript performance in the Firefox 83 browser, with the Warp update to the SpiderMonkey JavaScript engine enabled by default.
Also called WarpBuilder, Warp improves responsiveness and memory usage and speeds up page loads by making changes to JiT (just-in-time) compilers. Optimizing JiT is changed to rely solely on the CacheIR simple linear bytecode format, specifically, CacheIR data collected by the baseline tiers. The new architecture leveraged in the browser also is described as being more maintainable and unlocking additional SpiderMonkey improvements.
Firefox 83 was published in beta October 20 and is scheduled to be released November 17. Warp has been shown to be faster than Ion, SpiderMonkey’s previous optimizing JiT, including a 20 percent improvement on Google Docs load time. Other JavaScript-intensive websites such as Netflix and Reddit also have shown improvement.
Basing Warp on CacheIR enabled removal of code throughout the engine that was needed to track global type inference data used by IonBuilder, resulting in speedups. Although IonBuilder and WarpBuilder both produce Ion MIR, an intermediate representation used by the optimizing JiT back end, IonBuilder had a lot of complex code not needed in WarpBuilder. Warp also can do more work off-thread and needs fewer recompilations. Plans call for continued optimizations on Warp, which at present is slower than Ion on some synthetic benchmarks.
Warp has replaced the front end — the MIR building phase — of the IonMonkey JiT. Plans call for removing the old code and architecture, which is likely to happen in Firefox 85. Additional performance and memory usage improvements are anticipated as a result. Mozilla also will continue to incrementally optimize the back end of the IonMonkey JiT, as Mozilla believes there is still room for improvement for JavaScript-intensive workloads. Also in development is a tool for web developers and Mozilla to explore CacheIR data for a JavaScript function.
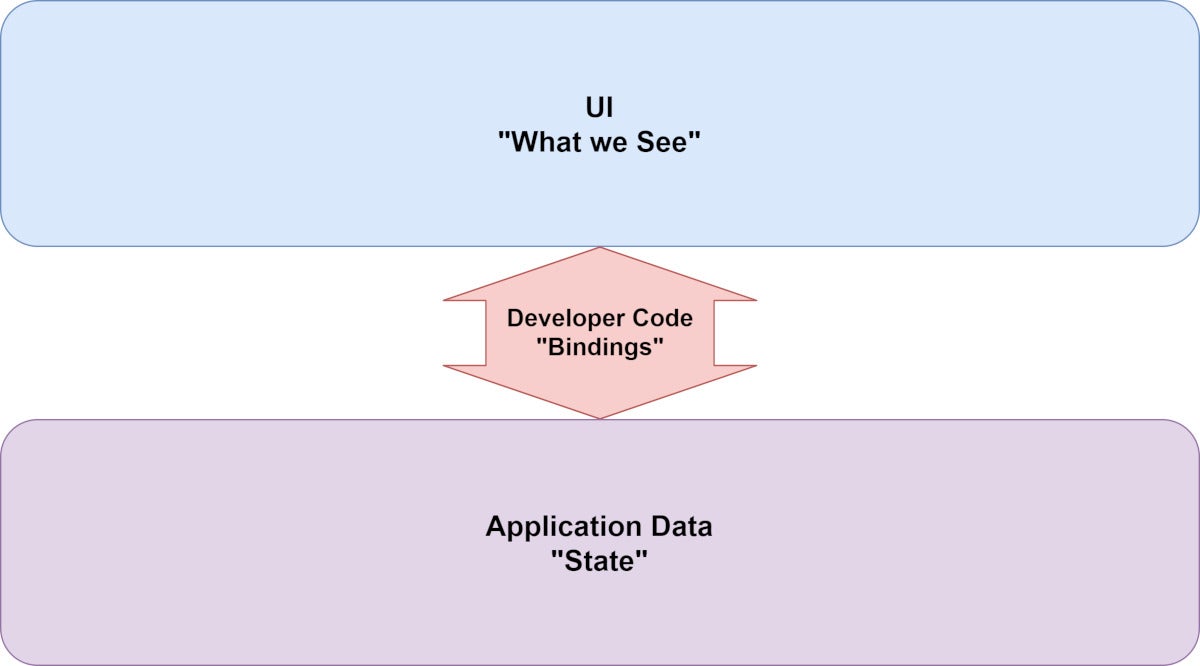
Figure 1 describes how state manifestation is handled without such frameworks. Figure 2 describes how it is handled with the frameworks.
Figure 1. Without data binding
IDGFigure 1.
Figure 2. With data binding via Angular, React, and Vue
IDGFigure 2.
Components
The frameworks also align in being component-based. This is not a new idea: Each area of the user interface is represented by a component. The code in the component determines what is displayed and how the view behaves. Bundling state-driven data binding into components delivers the critical advantage to all three frameworks that makes them superior in complex interfaces to what went before.
Industry adoption profiles
Now we will take a look at the presence of each framework in the industry, to get a look at the level of adoption and viability. What I mean here is, when you choose a framework for a new project, or decide on which framework to learn, you want to be sure you are adopting a framework that is going to be successful over the long term.
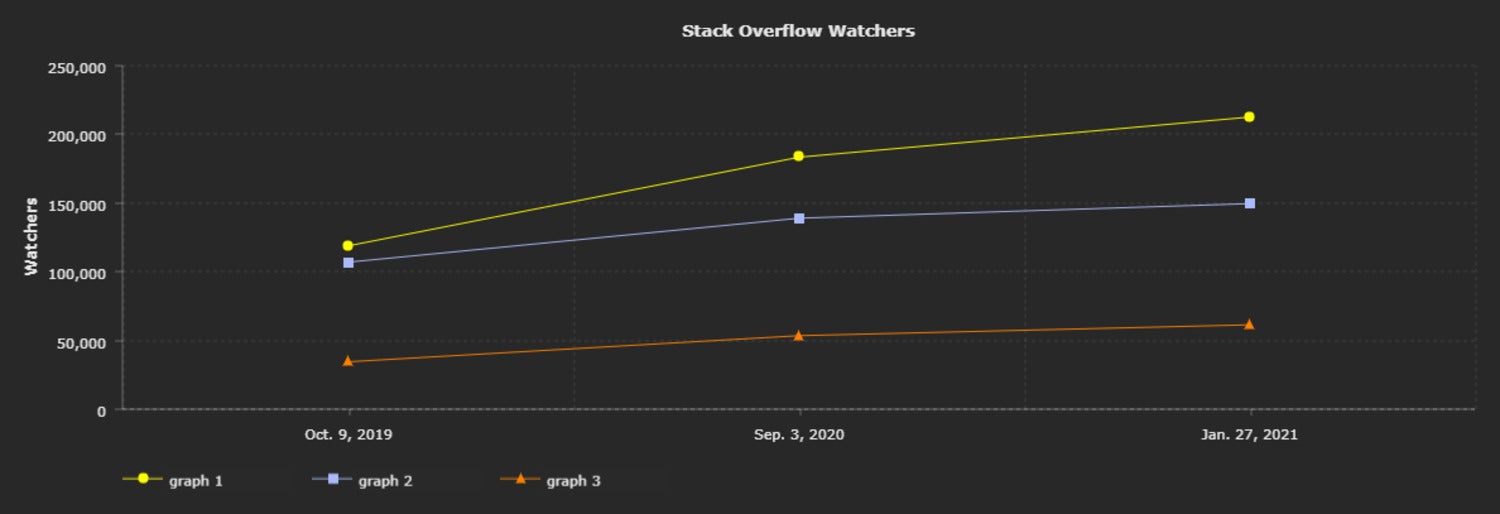
Figure 3 looks at the number of watchers each framework has on Stack Overflow. A few things are clear from this chart. All three frameworks have a strong presence on Stack Overflow, although Vue is far behind with just over 50,000 watchers. ReactJS has a commanding lead, which has increased over the past year.
Figure 3. Stack Overflow Watchers
IDGFigure 3.
Figure 4 looks at GitHub stars. Here Angular takes last place, lagging far behind. Interestingly, Vue is in the lead, and well ahead of React, indicating a great deal of curiosity (if not actual use) in the project. In each case, over the last year, the frameworks have shown increasing interest at about the same rate.
Figure 4. GitHub Stars
IDGFigure 4.
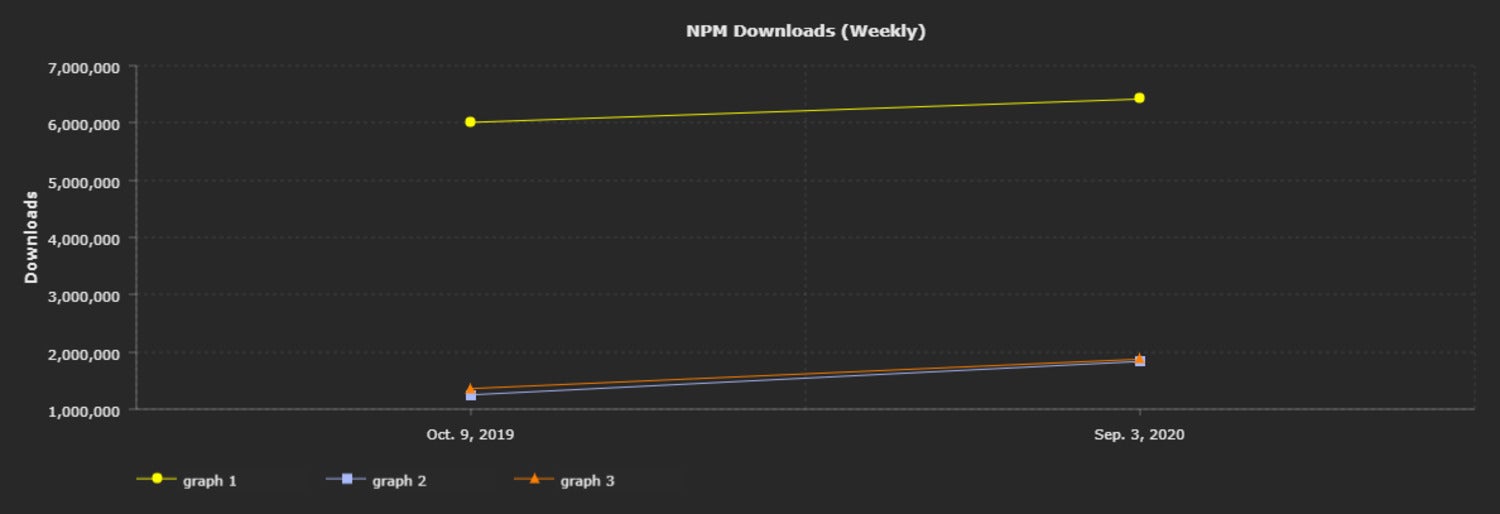
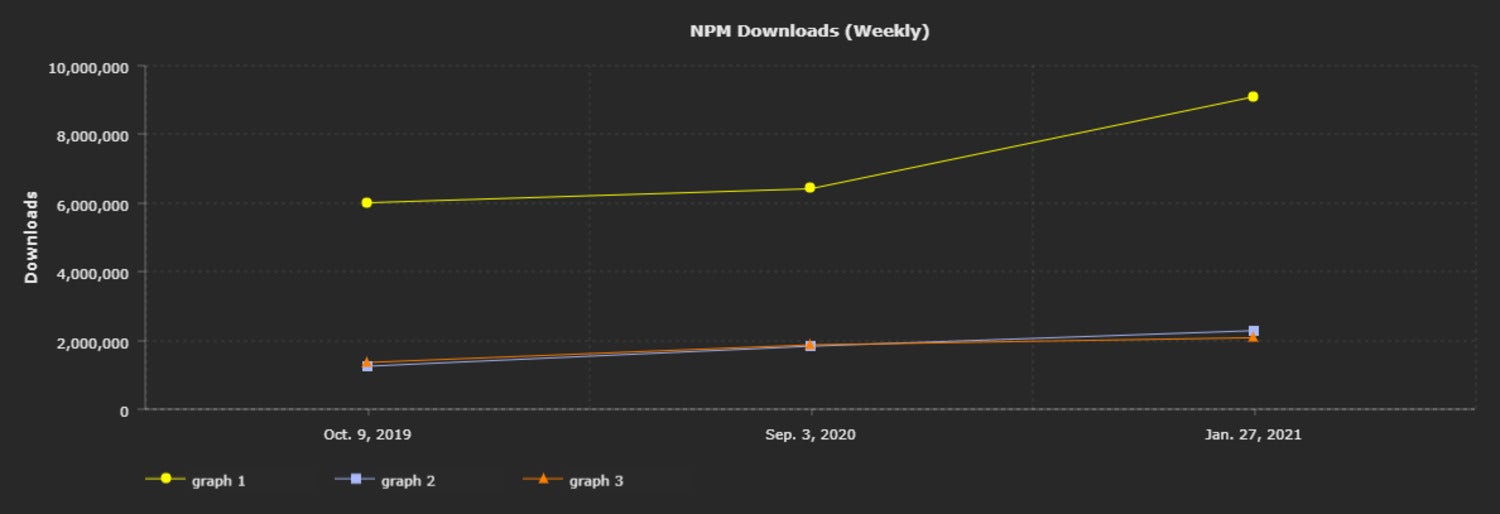
GitHub stars tend to reflect people’s theoretical interest in a project. Figure 5 looks at weekly NPM downloads, which is an indicator of active, practical use of the projects.
Popularity take-away
Each of these frameworks appears to have enough up-take to be long-term viable. React’s popularity means it is easier to find developers who know it, and easier to find employers that are hiring for it.
Figure 5. NPM downloads (weekly)
IDGFigure 5.
The fact that leaps out in Figure 5 is that the actual active use of frameworks goes to ReactJS by a landslide. React has almost twice as many weekly downloads as the other two frameworks combined. It’s no surprise that React is the most in-use framework, but it’s notable just how significant its lead is.
Technical comparison
You’ve seen how the frameworks are conceptually similar, and had a look at their relative presence in the industry. Now let’s have a look at their technical aspects.
Angular
Angular 2+ was “designed from above.” That is, a bunch of smart people sat down and decided what would make for the ultimate front-end JavaScript framework.
In many ways, they succeeded: Angular is a very complete framework. On the other hand, Angular can feel overwhelming to learn and use the framework, as you are immediately required to master a large set of interacting elements (services, dependency injection, etc.) to achieve anything.
Angular is intended to incorporate everything you might need to develop large-scale front ends. In comparison, React relies upon community-developed plug-ins (for router support, for instance).
Ultimately, you as a developer are inside a code-thought-machine that wants you to conform to its ideals and conventions.
On the plus side, the wholesale adoption of ReactiveX (RxJS) across the board is innovative and forward-thinking. Not only does it mean all the event handling needs (intra-component, inter-component, back-end service calls, etc.) are managed via the same mechanism, but the same well-built framework (ReactiveX) and its learning will transfer to any other language you can imagine.
Moreover, large-scale projects with many team members may benefit from the more rigid and well-defined architectural style present in Angular.
There are varying opinions about the benefits and drawbacks of TypeScript, but you will code and read TypeScript if you use Angular. Another executive up-front decision.
Angular adopts ECMAScript classes wholesale. These classes use the built-in state as the component state. These are decorated with annotations to define their metadata.
Views in Angular are similar to views in Vue in that they are straight HTML templates with additional data-binding and logic support via inline directives.
Angular uses NgRX/store as its built-in, centralized state management plug-in.
Angular component example
Listing 2 displays a counter component similar to the React example, and is derived from this example.
Notice the @Component annotation. This is a “decorator” that informs Angular that the JavaScript class that follows is a component. Other features like services are handled in a similar fashion.
Also observe that the state is handled as a class member: public counter. This is a fairly clean way to build components atop JavaScript’s native syntax.
The interactive part of the component is added to the button elements via the (click) directive that is analagous to the DOM method onClick, but allows for calling methods on the component class. In this case it executes the increment and decrement methods.
Finally, the inline token {{counter}} allows for outputting the data-bound variable. This is slightly different from React’s syntax, but almost the same, and serves the same purpose.
React
React’s strength is that it has organically grown up from in-the-world use and has continued to develop in response to heavy usage. It has undergone extensive growth, but its roots and ongoing advantages reside in its being a framework used by Facebook for its own applications.
You can see Facebook’s committment to driving innovation in the framework with forward-looking features like Concurrent Mode (still in experimental mode at the time of writing).
React has also aggressively developed what is known as “pure” or functional components and hooks to empower them. These components avoid some of the overhead of class-based components. Vue has some support for functional components, and it is possible to create them in Angular, but React is the clear leader in this area.
Component definition and interactions are relatively straightforward in React, honoring the principle of least surprise.
As long as you avoid unnecessary Redux usage, the handling of React with a large-scale application is as good as Vue. Angular handles large code bases in a consistent manner and can offer benefits over React in this area. It is possible to define elegant large-scale apps in React, but the framework itself isn’t going to do as much as Angular to enforce that definition.
React uses an immutable state object accessible only via setState() to represent component state. This is different from Vue and Angular, which employ a more built-in JavaScript approach to state data.
React employs JSX for its view templates. JSX is an interesting approach in that it is like HTML with JavaScript superpowers (or JavaScript with HTML superpowers, if you prefer). JSX can be a bit off-putting when first learning the framework. It works quite well in the long run and is not difficult to learn if you arleady know HTML and JavaScript.
React’s default centralized data management is handled via Redux.
React component example
Listing 1 has a simple component example in React, derived from the React docs. This is a functional component, as that is the primary way to build components going forward.
Notice how the state is handled via the useState “hook.” This exposes the setCount() method to the template. The template is returned by the actual component function, and is written in JSX. JSX allows the inline integration of the JavaScript function into the onClick attribute of the button element, which interacts with the component state. The state is also accessed via the {count} token in the template markup.
Vue
Vue adopts a “normal JSON object as state” philosophy. Any time you can just use the language itself, it’s a win for simplicity. So you’ll find Vue simpler in this respect than React’s setState(), for example. However, there are edge cases and caveats that ultimately mean you are dealing with a native-JSON-hybrid beast.
In a sense, Vue is somewhere between Angular and React, a compromise between Angular’s top-down design and React’s organic growth.
Despite being the newest contender, and lacking the backing of a large corporation, Vue has kept pace with developments and delivers a fully viable framework. Also, there are a number of quality plug-ins and kits for Vue (like Quasar and Vuetify).
Vue has a reputation for being the easiest to learn. That probably derives from its JSON data model and HTML-with-decoration view definitions (versus React’s JSX). Vue templates can also incorporate inline JavaScript functions, unlike JSX.
Vue offers Vuex as its built-in, centralized state management solution.
Vue component example
Listing 3 shows a simple component definition in Vue, from the Vue docs.
// Define a new component called button-counterVue.component('button-counter',{ data:function(){return{ count:0}},template:'<button v-on:click="count++">You clicked me {{ count }} times.</button>'})
In Listing 3, you can see that the component is exported as a CommonJS module. This is the Vue idiom for defining the component code. The template is identified as the template member.
Within the object that the module exports is the data member. This is a function that returns an object defining the component’s state.
Notice that the template allows for HTML with inline directives like v-on:click, similar to Angular’s (click) or React’s onClick. The syntax in Vue for outputting bound variables is the same as Angular: {{count}}.
Performance comparison
Performance can be tricky to get a handle on. This excellent article offers a data-based comparison of the three frameworks in three areas: DOM manipulation, load time, and memory allocation.
In the categories: Angular wins for DOM manipulation (in most cases); Vue wins for load times; React and Angular win for memory allocation.
In general, it’s not terribly valuable to make a performance-based decision among the frameworks. How you use them will make the biggest impact on performance.
Native support and server-side rendering
Although Vue and Angular also support to-native features and server-side rendering, React seems to be keeping well ahead in terms of the simplicity in using these. JSX has a good feel for me personally, in that it keeps related code and layout close together. Others have had a less happy experience with it. Overall, I count JSX as a positive for React.
Which framework to use?
The question as to which technology is best is impossible to say definitively. There are quantitative differences, but in the end it is a qualitative decision.
As with many technology choices, external factors can play a big role. In particular, your familiarity with the frameworks and that of your team will weigh heavily. Availability of developers who know the tech is also important, and in that arena, React is the clear winner. The React project also seems the most committed to offering forward-looking innovations.
Microsoft and Google are partnering to promote web browser compatibility around a number of CSS (Cascading Style Sheets) features, with an effort called #Compat2021.
Also involving open source software consulting firm Igalia and the broader web community, #Compat2021 aims to improve compatibility in five specific areas:
CSS Flexbox, a CSS module that defines a CSS box model optimized for user interface design and the layout of items in a single direction.
CSS Grid, for dividing a page into regions or defining the relationship in terms of layer, position, and size, between parts of a control built from HTML primitives.
CSS Position: sticky, or sticky positioning, which is akin to a hybrid of relative and fixed positioning.
CSS aspect-ratio property, pertaining to a CSS property setting a preferred aspect ratio for the box, to be used in the calculation of auto sizes and other layout functions.
CSS transforms, for rotating, scaling, skewing, or translating an element.
The joint working group involved in the project identified these focus areas based on the number of related bugs in each vendor’s tracking system, feature usage data, survey feedback, CanIUse data, and web-platform-tests test results.
While working group members will focus on their respective implementations, the Microsoft Edge team plans to contribute fixes to the Google-sponsored Chromium project to pass all CSS Grid tests in 2021 and to support improving interop across browsers.
#Compat21 was announced on March 22. Progress on the project can be tracked on the Compat 2021 dashboard.
One of the key roles in the success of the site plays the color scheme. Color directly affects the perception of the site by visitors: it can inspire confidence and encourage purchase, but it can also push away. The fact is that in our case the adage “to meet clothes …” is fair, as users do not trust resources with poor design.
Getting to the main page of the site, a person needs only a couple of seconds to decide for himself whether to leave the page or continue studying the resource. Competently made design and correct color design is an increase in conversion and simplification of attracting potential customers. Therefore, let’s look at the principles of the correct selection of shades, and on what the choice of the color palette is based.
What color should my site be?
What exactly you can not do when choosing a color, so it is guided by their own preferences. Focus on the fact that the site is created for users, not for you, regardless of its focus: eCommerce, information, business card, etc. In the matter of color choice, it is necessary to understand its manipulative abilities (psychological influence on the user’s consciousness / subconsciousness) and, having such knowledge, use them to achieve the goals set. Consider the three aspects on which the choice is based.
Form style. If your product already has its own logo / corporate identity, recognizable among the masses, or it is already at the development stage – it is recommended to design the site using appropriate colors. However, it is necessary to take into account how harmoniously the chosen colors are combined between each other and which picture will form as a whole. Sometimes, the colors used in the logo can be replaced with shades close in tonality, “playing” with contrast, hardness and other parameters.
Concept / theme. Color design should logically continue / complement the theme of the site, reflect the product / service promoted. For example, a website for the sale of different varieties of coffee is often made in shades of brown, and the thematic resources on healthy nutrition take the green color as the basis.
The target audience. What contingent of visitors is your site designed for? Men positively perceive neutral and muted shades. Women come to taste smooth and delicate combinations of pastel colors in the design. And, of course, children are attracted to juicy, bright and catchy images.
Features of color perception
It should be remembered that perception is not constant and depends on a number of short-term and permanent factors: place of residence, cultural characteristics, religion, emotional state and mood, age, gender. But there are also a number of standard associations for most people who are provoked by different colors.
Red. Often it is tension, aggression, passion or love. Provokes a sense of anxiety, threat, focuses on attention. Great for drawing attention to a specific functional element of the resource (advertising, order button, etc.). It is not recommended to abuse this color, because in view of high expressiveness and saturation, it can “play to the detriment”.
Orange. Like citrus fruits that contain many vitamins to maintain tone and energy, this color exudes bright and positive emotions, causes associations with positive, constant movement, friendliness and tireless youth. Suitable for sites whose target audience is young people. It is also often used in the design of accents (competent design using additional shades will allow users to focus on the elements you need).
Yellow. Warm joy, happiness, childhood memories, life energy. This color is suitable both for children’s themes and for promoting their own business ideas at the expense of universality. On the one hand – solidity, credibility, status; on the other – cheerfulness, energy.
Green. Associated with several topics at once: finance, health, ecology, nature, improvement or security. This multitasking color allows you to combine it with different shades in favor of a particular message.
Blue. Pacification, calm, reliability, stability and confidence. This color will allow you to gain the trust of the user, leaving no doubt about your professionalism. Often used sites that sell jewelry, engaged in floristics or specializing in the design direction.
Violet. An abstract color that touches something mysterious, romantic and mystical. It should rely on the female part of the audience, offering products of a specific subject / exclusive products.
White. It is used as a background that allows the visitor to focus attention on the positions offered by the site. It is mainly used by online stores and corresponds to the current trend of minimalism in design.
The black. The opposite of white is also used as a background. Associated with aesthetics, dominance with notes of tension in a minimalist format. It creates a sense of luxury, but do not abuse the black shades.
How many colors do you need for website design?
Resources that combine all shades and colors of the rainbow are immediately repelled due to the fact that such a color splash does not allow focusing on the desired product / service / search object. Also, with a lack of colors, the site becomes monotonous, which is why the user’s perception also does not allow him to concentrate, dispersing his attention (the site’s content begins to be perceived as background). The best option – 3-4 colors, each of which has its own function.
The foundation. This color highlights most of the content of the resource.
Additional. With its help, information of secondary importance is highlighted. Color should be in harmony with the main.
Background. Neutral shade on which the first two colors are placed without affecting the user’s concentration.
Accent. The color with which users’ attention is drawn to certain functional elements, due to the high contrast relative to the primary color.
There are several services with which you can find ready-made solutions for the design of your site or you can do their own selection. However, it is more expedient to entrust this job to a specialist, operating with skills and experience, rather than with intuition and personal preferences in terms of design. Perhaps your chosen color will “fit” as best as possible into the minds of Central Asia, but without the correct presentation all efforts will be in vain. So do not hesitate, do not save – contact us.
They paid a lot of money, built ambitious plans, got the key, and the site does not bring anything? It is early to get upset, as the availability of the site does not guarantee anything (if they are not properly engaged). Therefore, we derive the most popular and effective ways to increase awareness and increase attendance.
SEO promotion
Search Engine Optimization – working through many aspects of a web resource, as a result of which it becomes much more attractive in the eyes of search engines. Literate SEO is when the content of the site is completely unique (+ meets all the requirements of the search engine algorithms), tags and description are correctly spelled, their own design, etc. With proper optimization, the search engines themselves will start promoting the site (closer to the top of the search results).
Benefits:
• stable traffic growth;
• lasting effect;
• access to the top search results.
But the effect of such a promotion can not be called lightning, because It does not belong to the category of aggressive / active. It is strongly recommended to order SEO from a qualified specialist, since the independent (incorrect) promotion has a dark side that can “sink” your site.
contextual advertising
The name of this method is derived from the word “context.” Those. what the user is looking for in a search engine, or by visiting a site of a particular subject is displayed in the ad unit. In other words: the consumer gets what he is looking for. The advantages of this method:
• high conversion (if a person follows the link on the banner, it means that he is interested in purchasing the advertised product);
• recoupment (today the cost of contextual promotion is quite democratic, and investments are beating off within a few days);
• easy setup (you can figure it out yourself).
However, unlike SEO (once paid – you reap the benefits for a long time), contextual advertising will work for you as long as you are ready to pay for it.
Each method has its own characteristics and is effective under certain conditions, and a complex application is simply a condemnation of the promoted website for success. An important point: it is strongly not recommended to engage in promotion on their own, because there is a risk not only to overpay, but to be left with nothing at all. It’s safer to use promotion services from a professional web-studio.
It makes no sense to explain the importance of having a site for any business, so let’s get to the point. The site is the face of the company, the business card of the entrepreneur and an obligatory attribute of doing business in modern realities. The main criteria for this tool:
• catchiness;
• informative;
• functionality.
In this case, we are interested in catchy. This criterion has a key impact on brand / enterprise / business awareness among consumers. Consequently, the web resource needs a design that combines positive aesthetic qualities, while not dispersing the user’s focus (but this is a topic for another conversation). And here there are two ways: to order the design of the site or to view ready-made templates and choose the one you like.
Read more about the “budget” and paid options.
Ready-made site design templates are a great option for projects with limited time and budget that do not claim to be a huge success. Landing, the site of a non-profit organization, go “for show” – they can be allowed to save. But such a choice is unlikely to provide recognition for a number of reasons, one of which is the search engine algorithms.
Based on this, smoothly proceed to the services of a web designer. Yes, it is much more expensive than the finished template. But in the context of search engines, we are interested in the uniqueness of the site (not originality). Search engines “love” unique content and design, so they themselves begin to promote a web resource. In addition, thousands of ready-made templates will not be able to fully reflect the idea, besides, it limits the usefulness of the site (there may be problems when adding changes / innovations, but in all business flexibility is important in everything).
What to choose?
In the short term, a ready-made site design template allows for a sharp start (especially when a new niche is being developed). However, after some time there are pitfalls: difficulties with the promotion of the site, obsolescence of the template and so on.
The original design of the site is suitable for serious projects for which image matters. Plus, the original sites are easy to advance, and the design as accurately as possible reflects the subject of the project and the wishes of the customer of the web resource. It is better to use the services of a web studio, which is a huge amount of time and nerve cells.
Every confident PC user and simple man in the Global Network has a rough idea about such specialties as a programmer, designer or tester. But we must not forget the one who does all the dirty work, conducts a delicate connection between the works of the designer and the work of the programmer. Without it, it is impossible to create a fully functioning website. It’s about the coder.
The layout process
Let’s put a typical situation in a spherical vacuum: you are a customer and you need a website. All the nuances regarding the project have already been discussed with the head of this project, your next goal is to choose the right design (or rather, choose). When a design model, assembled in stages from individual elements, forms a single whole, the layout designer enters the scene.
Design layouts are a document with images waiting to be put into practice. Now the layout created in the graphical editor must be transferred to the browser. This is how the layout acquires a new life directly on the web resource, and such a translation is called an HTML layout.
HTML coding is a time consuming process, as a result of which the site should be correctly displayed on devices of various types. The search engine algorithms react positively to sites with high-quality layout, “raising” them higher as a relevant result of a search query.
What exactly does the layout designer
In simple terms, a professional coder is an intermediary between the programmer and the designer. His profile includes both programming skills and an understanding of the basics of design. The coder takes the finished layout and describes it using tags. Those. for the programmer, the layout will look like a sequence of tags.
Main layout tools:
Browser;
Text editor;
Graphics editor.
At the same time, the layout should take into account not only the type of the user’s device, but also the browser used during the stay on the site. Site owners rightly take the maker-up for the shaman, because dancing with a tambourine is an integral part of his work.
Starting an online activity, the site will be a key factor in your success. In this case, the success of the project is determined at the stage of creating the site. In particular, programming, design, etc. are responsible for a positive result.
The cost of services of an experienced specialist / team (web studio), by definition, is not from the category of cheap. The price, inflated by the customer, forces it to descend into the dark nooks of freelance stock exchanges in search of budget options, giving the job to a freelancer. Is this a reasonable savings? Now find out.
Freelancers
Benefits:
relatively low cost of services.
Disadvantages:
Work “on trust” / non-contractual basis
Deadline Breach
Multitasking
“Wry” written code
Broken expectations
Traceless disappearance
Freelancers usually do not sign contracts regarding the terms of the project. This is fraught with consequences, which we will discuss next.
The absence of a signed document, in which the deadlines and financial responsibility for non-compliance with any of the points are clearly stated are favorable conditions for the development of laziness of a budget programmer. He can spend months with the delivery of the project for several reasons (for example, while working on other orders in parallel).
Frequently, a freelancer undertakes to carry out several fundamentally different types of work at once: programming, design creation, layout, etc. (doing everything almost simultaneously). Launching a site developed by such an “expert” often opens up a lot of pitfalls: bugs, glitches, code with errors, the correction of which will cost more than writing a new code from scratch. Or there is a mysterious disappearance, as a result of which the customer remains without access to the hosting or domain.
Web Studio (team of professionals)
The exact opposite of freelancer. Even at the consultation stage regarding the creation of the site, it becomes clear that both parties are equally interested in a quality final product. Let’s start with the pros:
The presence of the contract.
Well defined deadlines.
Full range: programming, design, testing, promotion, and more. Each type of work is performed extremely qualitatively.
Disadvantages:
High cost of services
A professional team of specialists ensures the successful launch of any project, as well as provide services in its future maintenance. Comparing the disadvantages and advantages, it becomes obvious that the savings on the site is highly likely to result in significant contingencies in the long term. Conclusion: it’s easier and safer to order website creation from a web-studio. It is foolish to expect a big profit from the project, which saved by all possible means.
Lorem ipsum dolor sit amet, consectetur adipiscing elit. Sed venenatis dignissim ultrices. Suspendisse ut sollicitudin nisi. Fusce efficitur nec nunc nec bibendum. Praesent laoreet tortor quis velit facilisis faucibus. Maecenas sollicitudin lectus diam, non vehicula arcu ullamcorper ac. In pharetra, est vitae interdum tincidunt, urna ligula rutrum tellus, sit amet pharetra purus magna eu enim. Sed iaculis imperdiet nisi, et pulvinar mauris gravida maximus. Phasellus vitae lorem at sem mattis volutpat. In eget dictum dui. Quisque nec sapien at massa mattis semper. Ut ac malesuada turpis. Fusce eu nulla vehicula, tincidunt dui ultrices, fermentum felis. Aliquam lectus nisi, feugiat ut aliquet sed, posuere sed libero.
Pellentesque consectetur massa nec nulla fermentum, at tincidunt elit volutpat. Duis vulputate placerat tortor, sit amet eleifend mauris tincidunt sit amet. Aliquam a maximus ligula. Phasellus nec sapien sed tellus tempor eleifend id a erat. Donec convallis bibendum posuere. Quisque mollis imperdiet malesuada. Suspendisse eget dictum massa.
Phasellus ac posuere nibh, in finibus nulla. In diam arcu, luctus sit amet condimentum sit amet, tristique et leo. Sed tincidunt justo a porttitor tristique. Nulla eu metus tincidunt, ornare magna ullamcorper, semper lacus. Quisque vitae porttitor odio, id tincidunt tellus. Fusce a suscipit eros. Proin sit amet risus fermentum, lobortis quam sed, consequat velit. Quisque sit amet ultricies lorem. Phasellus scelerisque ipsum eget ipsum posuere suscipit. Proin id molestie mauris, a venenatis ipsum. Quisque efficitur, nibh a dapibus mollis, metus tortor fermentum ante, non pellentesque mi magna non leo. Integer quis sem hendrerit, euismod dolor id, dapibus nulla. Maecenas non ultrices lorem. Pellentesque lobortis, diam eget feugiat lacinia, ante augue ullamcorper tortor, vel ornare sapien lacus pharetra quam.

 IDG
IDG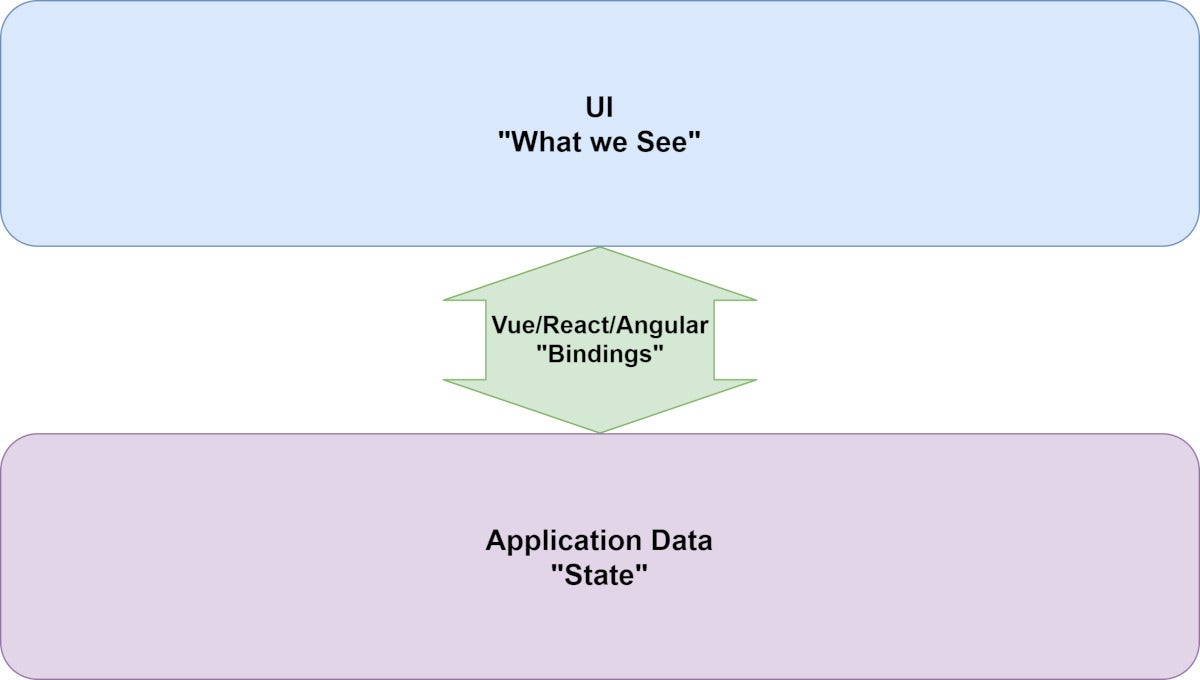 IDG
IDG